Showing posts with label bread. Show all posts

Thursday, February 16, 2012

Quick Cinnamon Sugar Twists from Pre-made Pizza Dough

I was cruising past the deli section of my local grocery store and noticed that the pizza dough was on sale. Ninety-nine-cents? I thought. I can work with that. So, for less than the price of a candy bar, here are a dozen-and-a-half hot and chewy Cinnamon Twists. Quick, easy and yummy even at full price. (For a savory version, dip in butter and sprinkle with Parmesan cheese and Italian herbs.)
Pizza Dough Cinnamon Twists

1 lb. of pizza dough
flour for dusting
3 Tbs butter, melted
1/2 cup sugar
1 Tb cinnamon

1.) Dust your surface with some flour. I used whole wheat. I know, kind of besides the point, right? Anyway, roll the dough out into a semi-rectangle like so.
 2.) Cut the dough into 9 strips and then cut those in half for a total of 18.
3.) Alternately dip the strips of dough into the melted butter and then roll into the sugar mix.And don't forget to smile.
 
 4.) Twist the strips and lay out on parchment-lined sheets.
 5.) Bake in 375' oven for 18 minutes. Serve hot. But really they're good cold too.

Thursday, November 3, 2011

Pumpkin-Orange Spice Muffins with Cinnamon Ginger Streusel

Ahh, fall is here. We recently took a car trip from North Carolina up to Connecticut and got to see a virtual, real-time fall season. The leaves were just starting to turn in North Carolina. They were in full glory by Maryland, tapered off in upper Pennsylvania and were at the tail end of the season by Connecticut. Luckily, we saw fall in reverse on the way back and are home in time to enjoy North Carolina in the peak of autumn. Our porch is blooming with yellow and burnt orange mums and we've collected enough pumpkins to make even Linus jealous.

What better way to celebrate fall than with these Pumpkin-Orange Spice Muffins with Cinnamon Ginger Streusel. You won't be able to get enough of their yummy pumpkin citrus spice flavor, moist, dense crumbs and crunchy streusel topping. These freeze and reheat well. Enjoy!

Pumpkin-Orange Spice Muffins with Cinnamon Ginger Streusel
Makes 2 dozen
(Adapted from Gourmet, Nov 2006 issue)

3 cups flour
2 tsp baking powder
1 tsp baking soda
1 tsp salt
2 cups canned pumpkin puree
1/3 cup oil
1/3 cup applesauce
4 large eggs
3/4 cup white sugar*
3/4 cup brown sugar*
2 tsp dried orange peel
1 tsp cinnamon
1/4 tsp nutmeg
1/2 tsp ginger
1/4 tsp cloves

Cinnamon Ginger Streusel Topping:
4 Tb flour
2 1/2 Tb brown sugar
1 tsp cinnamon
1 Tb butter
1/4 tsp ginger

Preheat oven to 350'
1.) Mix together the dry ingredients in a bowl (flour through salt).
2.) Mix together the wet ingredients and spices in a separate bowl (pumpkin through spices).
3.) With a fork or your fingers combine the streusel topping in a small bowl and set aside.
4.) Add the dry ingredients to the wet ingredients in batches, using a large spatula to combine, careful not to  over mix.
5.) Scoop out pumpkin batter into 24 paper-lined muffin tins.
6.) Spoon streusel evenly on each and press topping into batter.
7.) Bake for 18-20 minutes. Let cool slightly before serving.

*The original recipe called for two full cups of sugar. I added the streusel topping and substituted applesauce for some of the oil. I thought this would make up for some of the sweetness so I reduced the sugar to 3/4 cup each. I missed the full sweetness of the muffin though. Next time I'd add the full two cups of sugar but I leave it up to you.

Friday, September 16, 2011

Make your own homemade bread in a Dutch oven

I recently picked up Ratio: The Simple Codes Behind the Craft of Everyday Cooking by Michael Ruhlman. I was intrigued by the author's promise to become unchained from recipes. I imagined myself freely inventing in the kitchen with a few basic figures and techniques to light my way. Bye-bye cookbook collection! Well, of course, it didn't really work out that way. Turns out you can't exchange years of schooling and real-life experience for a $16 book. Shucks. But I will say that Ratio  is full of essential information, techniques and tips that have started to change the way I cook.
For starters, I now own a digital scale so I can measure ingredients by weight (ounces) instead of volume (cups) if a recipe calls for it. (I'm so proud of myself). And I overcame my fear of yeast. Those little buggers have broken my heart time and again. Hours of rising and punching down and kneading and all that lovely flour gone to waste. It's enough to make a girl curse...the yeast, of course. The Ratio recipe was not fool-proof, because, well, I was cooking. The dough came out very sticky and gooey in my KitchenAid mixer with the dough hook.
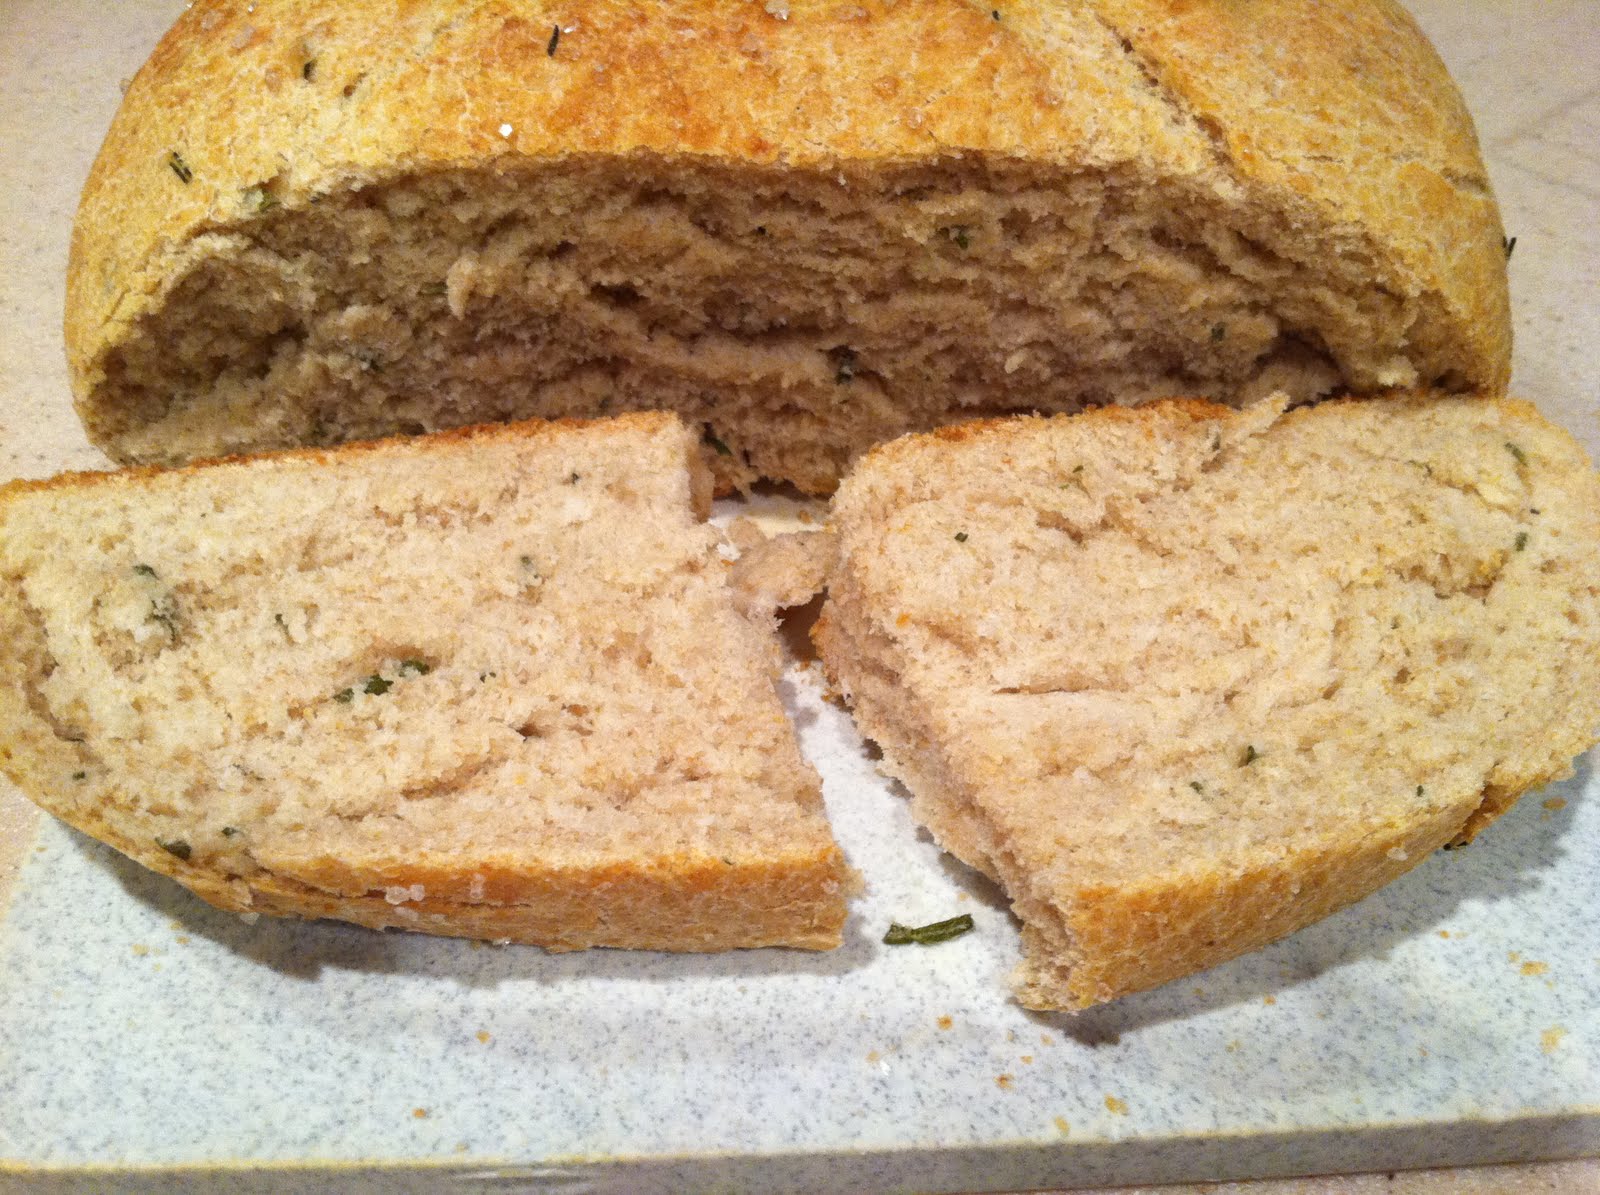
 I fought back tears, covered it in Saran Wrap and tossed the whole lot in the fridge. I might have eaten a few of those Fudgey Cheerios bars in the background for consolation. Two days later and the cold, dry atmosphere of the fridge had apparently whipped the dough into submission. I was able to shape the dough into a boule or round loaf.
I let it rise again in an oiled Dutch Oven, cut an "x" into the top and sprinkled it with fresh rosemary and sea salt. Okay, actually, I cut it and sprinkled it with rosemary and then let it rise. Next time I'll follow Ruhlman's instructions and wait until the dough rises first so my "x" doesn't get so spread out. And I'll work the rosemary into the actual dough and give it an egg wash for shine before sprinkling it with the sea salt. I did follow his instruction to place the Dutch oven's lid on for the first 30 minutes and then take the lid off for the remaining time.
 When my thermometer read between 180'-210' (another great tip from the book) I took it out of the oven. Ta-da! Gorgeous. Delicious. A crispy exterior and chewy interior and it only took me two days to get there. No wonder we just buy this stuff in the store now. 
I'm sure with more practice I'll get better at this. I mean, you can't put a price on homemade bread fresh out of the oven, can you? Okay, maybe you can, but it's the principle of the thing. I can't wait to try a couple of his bread dough variations, like chocolate cherry bread and grilled focaccia. When I get a hang of bread dough, I'll move on to pasta dough. That's kind of the way this book works, moving from one passion or obsession to another. You learn as much as you can about one recipe--sorry, ratio--and move on to the next. I'm still going to need this book as a crutch for a while, but maybe one day I'll be able to set it aside.

Update 9/14/11: I have since made this bread again and got it in the oven in a single afternoon, in time for a late dinner. Hurrah! The dough was a great consistency, not at all sloppy and wet like the first time.
I'm not sure what I did wrong the first time but I think it probably had to do with too much water. This time I incorporated the rosemary into the loaf instead of sprinkling it on top and let the dough rise before cutting the x in the top and adding the oil and salt. It worked great. Good recipe and I'll be making it over and over.

Tuesday, September 13, 2011

Dilly Cheese Dinner Rolls

Do the grocery stores get together and have meetings about what sales to try next? For a while double and triple coupon sales were big. Seems like the coupon people are wising up though because lately the coupons have been less than stellar. Then it was 4 for $10 or 5 for $10 deals. Now I'm seeing BOGO sales all over the place. Not that I'm complaining. I like to save money. But sometimes I get sucked into sales that aren't really great deals. Like BOGO cottage cheese. I don't even eat cottage cheese. Well, I didn't when I bought two 16 oz containers for the price of one. But I was bound and determined that for that price someone in my family sure as heck was going to. That someone turned out to be me as my three boys (including one man) turned up their noses and left me with 32 oz of low fat, small curd cottage cheese. Oh yeah, and less than two weeks before it expired
Allrecipes.com came to my rescue with this lovely little recipe for Dilly Rolls. (Apparently from the reviews this recipe is originally from Taste of Home magazine/cookbooks.) I know, not more yeast dough recipes! This time it didn't take me 2 days to get it to work. I think I'm starting to get the hang of this rise and knead and punch down and rise again stuff. Best of all, the rolls are healthy and they freeze and reheat great. I assume everyone else is as paranoid as I am about working with yeast dough, and so I included lots of step-by-step photos and instructions here.

Dilly Rolls
Makes 24


16 oz (2 cups) small curd cottage cheese
2 Tb butter
2 (.25 ounce) packages active dry yeast
1/2 cup warm water (110'-115' F)
2 eggs
1/4 cup sugar
2 tablespoons dried minced onion
1 tablespoon dill weed
1 tablespoon salt
1/2 teaspoon baking soda
2 cups whole wheat flour
2 1/2 cups all-purpose flour
plus more flour (see #4, #9)
cream or half-n-half for brushing on top

1.) Heat the cottage cheese and butter in a saucepan on medium heat. Set aside to cool to around 110'.
2.) In a separate container proof the yeast in the warm water.

3.) Add cottage cheese, yeast, and the eggs through the baking soda. I didn't have dill or dehydrated onions on hand so I used 2 heaping Tbs of a Penzey's Spices mix called Sunny Paris with dill, shallots, chives, pepper and terragon. The results were mild enough that when they baked up I could still enjoy the rolls with some jam and butter.
4.) Add the flour, mixing as you go, a cup at a time. Add enough additional flour to get a soft dough. I added another cup and a half for almost 6 cups total. Flour your surface and hands and add additional flour as you knead. Sorry no photos on that step. I was on my own and my hands were pretty sticky. You can also let the dough hook in your mixer do the work. You know the dough is ready when it doesn't tear easily when you try to form a rectangle with a small hunk of dough. Also, when you press in the center of the dough it springs back slowly. Here's what your dough will look like after 8-10 minutes of kneading. Do a search on You Tube for videos on how to knead dough by hand if you're not familiar with it. This dough is oiled already which accounts for the wet look. You can still see some chunks of cottage cheese. It will melt into the final product.
5.) Form dough into a smooth ball and place in an oiled bowl, turning once to oil both sides. Cover and let rise until double, about an hour. Of course, make sure you put it in a bowl large enough to accomodate the rise or you'll end up with this. Reminds me of what it feels like to be 8 months pregnant, bursting out of everything you wear.
6.) Punch the dough down. Shape it into a long rectangle and score with a knife into 4 by 6 squares like so. This just helps you get more even sized rolls.
7.) Form into 24 balls and place in a greased 9" x 13" pan. These rolls were so tall and luscious next time I'm going to try and make two pans and make the rolls smaller. I think they'll cook more evenly that way too.
8.) Let rise until doubled, another 45 min to an hour. Preheat oven to 350'. Brush with cream and place in oven.
9.) Halfway through baking, dust with flour. If the rolls on the outer edge start to get too brown before the ones in the center cook through then cover with foil. Bake 20-25 minutes.
10.) Remove from the oven and let cool slightly before tearing off the rolls you want for your meal. When the leftovers are entirely cool, place them in a container in the freezer and reheat for another meal.
Mmm, chewy, soft moist dinner rolls you can pull from the freezer for dinner...
...or breakfast.

Saturday, September 10, 2011

Blueberry Zucchini Muffins

A picture's worth a thousand words so I'll be brief. Make these. Today. And eat a couple. You won't regret it. Thanks again to Allrecipes.com for this one. I made some modifications from the original. Who can help but tinker. But really, these are great.

Blueberry Zucchini Muffins
Makes 2 dozen muffins

3 eggs, lightly beaten
1/2 cup vegetable oil
1/2 cup applesauce
3 teaspoons vanilla extract
1 1/2 cups white sugar
2 cups shredded zucchini
2 cups all-purpose flour
1 cup whole wheat flour
1 tsp salt
1 tsp baking powder
1/4 tsp baking soda
1 Tb ground cinnamon
2 pints fresh blueberries

Oat topping:
2 cups oats
1/2 cup flour
1/2 cup brown sugar
1 tsp cinnamon
1/2 stick butter

Preheat oven to 350'.
1.) Shred one medium zucchini for 2 cups zucchini.
2.) Combine eggs through sugar and fold in zucchini.
3.) Beat in the dry ingredients. Gently fold in the blueberries with a spatula or wooden spoon, just until combined.
4.) Scoop into two well greased or lined muffin pans. I had my oat topping mix left over in the freezer from an earlier recipe. But at this point, go ahead and mix together the oat ingredients with a fork in bowl. Sprinkle it over top the muffins and press with the back of a dry spoon so the oats sink into the batter. Okay, great tip. If you have some empty muffin tins for some reason, fill them with water before putting them in the oven. This will keep the pan from warping while the muffins bake. Don't you hate it when that happens? Just make sure you remember the water in the pans and don't try to flip the muffins out onto the counter. Very messy.
5.) Bake for around 15 minutes or until a pick comes out clean. Rotate halfway through. Let cool before removing from the pan. I baked these the same day I made some bread rolls and my house smelled heavenly.
Enjoy!

Monday, August 22, 2011

Five uses for day-old bread

When I've spent two days making bread from scratch I'm not letting a single, hard-earned, day-old breadcrumb go to waste. But you don't have to make your own bread to want to save pennies. So here are a couple of ideas to use up day-old or stale bread, whether homemade or store bought.

1.) Dessert/snack. You can use it in bread pudding, which is not my favorite food, or you can cut it in slices, warm it in the oven until just softened and spread it with melted chocolate or Nutella. (see above)

2.) Salad croutons. Cut the bread in large cubes, saute it in butter until coated. Sprinkle with salt, pepper and parmesan and toast in the oven, turning once to brown evenly. Let the croutons cool and toss them in a salad with a dressing like the vinaigrette I used below.
 3.) Dinner: Panzanella. See my post from last year for a yummy bread salad. You have to try this with fresh summer tomatoes. Mmmm.
4.) Lunch: Goat cheese toasts. Don't have time or have bread that's too rustic to make grilled cheese? Toast the bread in your toaster oven, drizzle with olive oil and spread with goat cheese for lunch. You can also use cream cheese or ricotta cheese.
5.) And then of course, there are breadcrumbs, which can be used in any course. Slice the bread and toast it in the oven until well browned and crisp but not burned. Let cool. Pulse in a food processor until fine and store in the freezer.

How do you use your stale bread?

Sunday, April 3, 2011

Chocolate Chip Banana Muffins

Sometimes inspiration for baking comes in simple forms, like paper muffin cups and half a bag of bittersweet chocolate chips. Oh, and a bowl of past-their-prime bananas.

Banana bread is the PB&J of sweet breads. It reminds me of a cold winter day home from school with my Mom. Comfort food at its best. And since we had sleet this morning and a threat of snow (In March? In North Carolina? Who do I see about fixing this weather thing?), banana bread muffins will fit the bill. Mom always used to put chocolate chips in her bread, and I'm of the same persuasion. Ain't nothin' that can't be improved with chocolate. I also added brown sugar and cloves to this recipe from joyofbaking.com, took out the nuts since we didn't have any on hand, and put the batter in muffin cups. These freeze great and reheat easily for breakfasts in 30 seconds in the microwave. Use mini-chocolate chips and mini-muffin pans for a sweet treat for the kids.


Chocolate Chip Banana Muffins
1 3/4 cup all purpose flour (I use a mix of white and wheat)
1/2 cup white sugar
1/4 cup brown sugar
1 tsp baking powder
1/4 tsp baking soda
1/4 tsp salt
1 tsp cinnamon
1/4 tsp cloves
1 cup chocolate chips
3 mashed bananas
2 eggs
1/2 cup butter, melted and cooled
1 tsp vanilla
1.) Since banana bread is such an old-fashioned treat, I decided to mix it up the old fashioned way--by hand. It's too easy to over mix sweet breads with an electric mixer anyway. Then it gets all tough and rubbery. So... mix all the dry ingredients in a large bowl, flour through chocolate chips.
2.) In a separate bowl, mash the bananas with the back of a fork and stir in the remaining wet ingredients until combined.
3.) Make a well in the dry ingredients by pushing the mix up against the side of the bowl.
4.) Plop the wet ingredients into the bowl and stir slowly, gently, almost folding the wet ingredients into the dry. Some dry pockets might still remain. Resist the urge to keep stirring.
5.) Using a 1/3 cup measuring cup, spoon batter evenly into 12 or so regular muffin cups.
6.) Bake in preheated oven at 350' for 20-25 minutes. Tops will be cracked and browned when done and no goo will come out if you insert a toothpick--not accounting for the chocolate chips of course.
7.) Let sit for a few minutes then tap out onto a rack to finish cooling.

Step eight: devour. Call your mother. Repeat.

Thursday, November 25, 2010

Quick Scones


I can't help but mess with recipes. The Glazed Cranberry Sunrise scones pictured here were based on a recipe from Sandra Lee's Semi-homemade show that aired earlier this month. I loved her Mocha Chip version, although I changed it a bit. The adjusted recipe is below. You can get her original recipe on foodnetwork.com. I liked the final result so much that I decided to use it as a template for making other kinds of scones. In addition to the Cranberry Sunrise version I came up with, I tried using 1/4 cup pumpkin puree and pumpkin spice to make a Pumpkin Maple scone. I was not as happy with that version though so didn't bother to post the recipe here. They looked cute but really lacked the good pumpkin flavor and color.

Also, while I was messing with this recipe I spent a writer's weekend at the beach with some friends and needed something quick to make everyone for breakfast. I didn't want to have to haul a ton of ingredients with me in the car and wanted minimal cleanup. So I mixed all the dry ingredients for the mocha scones in bags ahead of time and took coffee and creamer with me. I decided to omit the vanilla since it wasn't convenient. When it came time for breakfast, I brewed the coffee for everyone and whipped up the scones at the same time. They were a big hit and super easy. You could do this at home and keep them on hand in the pantry for Saturday mornings. Just add your liquids and egg and you're all set.

One last hint on shaping the scones. I used more like 3 cups of the baking mix. Otherwise, I found them to be too dry and crumbly. Sandra Lee had a great hint to press the dough down into a 9" cake pan and then tap it out onto the counter and cut the scones. Her recipe also called for cutting the scones into 12 slices but I like the nice big scones you get when you make eight.

Glazed Mocha Chip Pecan Scones
*Cranberry Sunrise scone alternative below
  • 1/4 cup strong brewed coffee, cooled
  • 2 tablespoons heavy cream
  • 1 large egg lightly beaten
  • 1 teaspoon vanilla extract
  • 3- 3 1/2 cups baking mix
  • 1/2 cup sugar
  • 1/2 cup chocolate chips
  • 1/2 cup chopped pecans
Glaze:
  • 1/2 cup powdered sugar
  • strong coffee, cooled
1.) Preheat oven to 350 degrees F.
2.) In a small bowl, combine coffee, cream, 1 egg, and vanilla; set aside.
3.) In a large mixing bowl, combine baking mix, sugar, chocolate chips and pecans.
4.) Add wet ingredients to dry ingredients and work into a crumbly dough. On a lightly floured surface, form dough into a 9-inch disk (approximately 1/2-inch thick). Cut into 8 wedges and place on ungreased baking sheet. Bake for 18-20 minutes. Let cool.
5.) For the glaze, add cooled coffee one tablespoon at a time to the powdered sugar until a thick glaze is formed. Drizzle on scones. When the glaze has set slightly, lift the scones and rub the bottoms in the excess glaze that has run off onto the pan. Let set before serving.

To transform this recipe, replace the coffee in the scones recipe with 1 Tb orange juice concentrate and enough water to make 1/4 cup. Replace the chocolate chips with dried cranberries and the pecans with chopped walnuts. For the glaze, use orange juice in place of the coffee. For a richer glaze, alternate the o.j. with cream until you get the right consistency.
Related Posts Plugin for WordPress, Blogger...