Wednesday, December 15, 2010

We Wisk You a Merry Kissmas

I recently came into possession of three bags of dark chocolate Hershey Kisses. Lord, help me, they were buy two, get one free at Food Lion and I had a $1 off coupon. So 216 individually wrapped kisses later, I was trying to figure out what to do with them--besides eat them immediately. I made a batch of Rich's favorite Peanut Butter Blossom cookies, whose recipe promised to use 48 and only used up 24. Drat. So I made the Triple Chocolate Threat Kiss cookies, knocking off another 36 or so. Only 156 or so left, right? Then, my friend Jenna gave me the great idea of filling the tines on stainless steel wisks with kisses and attaching a note that says "We Wisk You A Merry Kissmas." Too cute and great teacher gifts. So I used 40 for 4 wisks. Are you keeping up with the math? Today, my sister, Rebecca, gave me another great/horrible idea to make these pretzel treats. WOW! I never knew I could eat so many kisses in one sitting. We made 85 of these babies tonight, using the last of our kisses. Phew. Wait a minute, you say. That doesn't add up. There are 31 unaccounted for kisses. Where did they go? I'll never tell.

Now, hurry, Christmas, hurry! I've gained three pounds in as many weeks. If I keep baking I won't be able to fit into my brand new jeans.


Pretzel Kiss Surprises
  • 85 square pretzels
  • 85 Hershey Kisses, any variety except the filled ones would work I imagine (there are about 72 in a bag so use more or less as you like)
  • assorted M&Ms, marshmallows, salted peanuts, raisins or other topping
Preheat oven to 200'. Line a baking sheet with parchment or wax paper. Arrange pretzels and top with one Kiss apiece. Bake 5 minutes, or until the Kiss melts into the pretzel when pressed with the back of a spoon. Remove from oven and working quickly press toppings as desired into Hershey Kisses. Let cool before storing.


We topped ours with marshmallows, raisins and M&Ms. We also made pretzel sandwiches. The pretzel sandwiches were actually my favorites, but I really enjoyed the raisins too. Would love to try these with salted peanuts next time. Thanks Becca, great idea! I think I'll be taking a bag of these to the childcare workers at the gym tomorrow. I have a feeling I'll be seeing a lot of them in the next few weeks. :-)

Wednesday, December 8, 2010

Kefir Update

My kefir grains arrived in the mail last week, thanks to Marilyn at www.kefirlady.com. Here's a picture of what they look like. Kind of a yellowish cottage cheese curd. The instructions said the kefir grains will grow and if you get too many you can always eat them. So I gave one a try. Tasted like a chewy, yeasty dough but with a slimy texture. I know, Mom Hogan, this is really grossing you out isn't it? To get started, I poured 4 cups of milk over the grains, secured a light cloth over the top and set it out on my counter for 24 hours.


What a huge difference from the powdered version! The first batch I made of kefir with cow's milk I used Yogourmet's powdered kefir starter. Part of the reason I'm using the kefir is because I'm lactose intolerant and the kefir is an inexpensive type of yogurt drink with lots of probiotics that's easy on the stomach. Well, over the course of a day I worked the quart of yogourmet's kefir into my diet. Not a good idea. I was sick for 24 hours because the powdered version didn't devour enough of the lactose sugars in the milk. With the kefir grains, I didn't have to boil the milk and within 24 hours I had kefir I could use right away. I have now had three quarts with no side effects, and I'm finding I really like the flavor. It's very mild, although the texture isn't as creamy. But I think the lighter texture is also because I'm using 1% milk versus the goat's milk I used for the hot cocoa recipe earlier. Haven't tried to make this into hot cocoa yet. I haven't drank milk since I was a kid. Now what am I going to do with all of those $2 Silk coupons you gave me Maridith? :-) I've been drinking the kefir straight with meals and also using it to replace both the soymilk and yogurt in my smoothies. The kefir grains from Marilyn also came with great recipes on how to use it to make sourdough, since the kefir beverage can replace the yeast in the recipe. So something else to try.

Now the only problem I'm having is that my kefir grains are converting one quart of milk every day. I'm using 1% milk but that's still way more dairy fat than I'm used to and it will start to get expensive. I haven't figured out how to handle this. I put it in the fridge to slow it down but apparently that doesn't make the kefir grains very happy. So if anyone wants to buy freshly made kefir beverage from me, I will have a few quarts available each week. Bring your own container and I'll only charge you $2 a quart to cover the expense of the milk. I'm pretty sure that's much less expensive than you'll find it at Trader Joe's or Whole Foods. When the kefir grains start to double I'm happy to share those for free.

Friday, December 3, 2010

Gingerbread Men


I wish you could smell this picture. There's nothing like the smell of gingerbread baking in the oven. We started making these at Christmas a few years ago. We enjoy decorating them as a family and then give them away to friends and neighbors. This is our first batch this year and we made 25 or so gingerbread men and then 5 or 6 stars for us to eat. This year I used Royal Icing, which allows you to do all kinds of fun and fancy decorations and sets fast and quick. But really we do very basic things with our gingerbread men so next time I think I will stick with the old shortening icing recipe. I posted both below.

The funny thing about decorating cookies as a family is how everyone's personality shines. Here are my cookies: cute, colorful, a little skimpy on the frosting maybe, but all neatly identical for gifting.

And here are Rich's cookies: such an engineer. I like how he worked the NC State basketball player into the mix. When I pointed out that we were giving these away to other people he said I was stifling his creativity. Yeah, yeah, yeah.

And then we have Lincoln's cookies: generous on the candy. Such a giver. Mommy piped the frosting on his, because the tip I used was too small and you had to really squeeze hard to get it out. The ones he decorated all by himself he got to eat. He was very happy with this arrangement. I know, I'm such a control freak.

The next day, when the cookies were hard, I bagged them up with these cute bags I found at Michael's. The kids and I are going to deliver them this afternoon in our little red wagon to the neighbors. I love where we live but we don't see much of our neighbors. Must be lots of fellow introverts. I guess that's why we all chose to move to a neighborhood with acre lots. So this is a good excuse to say hi.


Gingerbread Men
6 cups flour
1 tsp baking soda
1/2 tsp baking powder
2 sticks butter
1 cup packed dark brown sugar
4 tsp ginger
4 tsp cinnamon
1 1/2 tsp cloves
1 tsp ground black pepper
2 eggs
1 cup unsulfured molasses

1.) Sift together flour, soda, baking powder. Set aside.
2.) Cream butter and sugar until fluffy. Mix in spices, salt, eggs and molasses. Add in flour mixture.
3.) Divide dough in half and form into disks. Wrap in saran wrap and chill in fridge at least 2 hours.
4.) Lightly flour counter and rolling pin. Line baking sheets with parchment.
5.) Preheat oven to 350'.
6.) Roll out first disk of dough, keeping the other in the fridge, to 1/4" thickness. Use large gingerbread men cookie cutters to cut out cookies and transfer to baking sheets.
7.) Bake for 8-10 mins. Let cool and decorate as desired.

Royal Icing
1 lb. confectioners sugar
5 Tbs meringue powder
1/2 cup frosting
Gel paste food coloring
(*Gel paste and meringue powder available at Wal-mart or AC Moore or other craft store.)
Combine all ingredients except gel paste and beat for 8-10 minutes until still peaks form. Add gel paste to change colors as desired. To thin, add water 1 Tb at a time. To make the frosting more stiff add powdered sugar. Freeze any extra frosting for later use.

Shortening Icing
4 cups confectioners sugar
1/2 cup shortening
5 Tb milk
1 tsp vanilla
Blend all ingredients. Color as desired. Freeze any extra frosting for later use.

Saturday, November 27, 2010

Hot Kefir Cocoa


Already trying to answer the question, "Now that I've got a quart of kefir in my fridge, what do I do with it?" I used some in place of soy milk for a berry smoothie for breakfast this morning and then thought I'd make a little pick-me-up in the afternoon. Mmm, warm, spicy, tangy, creamy hot cocoa. So yummy--really! Kids both drank the smoothie in the morning; Linc tried the cocoa but was not a big fan. He said maybe if it was with cow's milk next time. Or marshmallows. :-)

Hot Kefir Cocoa
1/3 cup cocoa powder
3/4 cup white sugar
1/3 cup hot water
4 cups kefir (mine was goat's milk but cow will work great too)
1 tsp vanilla
1/2 tsp cinnamon

Combine cocoa, sugar and water in saucepan. Cook on low heat and stir constantly two minutes. Don't scald it. When the sugar is all dissolved, stir in the kefir and heat gently, just until hot. You don't want it to boil or you'll kill all those lovely bacteria, and then what's the point, right? Makes 4 servings. I had leftovers and poured them back into the jar when cooled. Heated it up the next afternoon and mmmm. I'd try to use it all the first time though if you can. I'm not sure how healthy those bacteria are after being heated so many times. It was delicious though!

Thursday, November 25, 2010

Kefir Culture


In researching a fiction story I'm writing (yes, I've started writing fiction again) I came across a plethora of information on kefir. The character in my story has a herd of goats and I was trying to come up with something she could sell from the goats' milk--other than milk and chevre of course. I started wondering if it was possible to create an alcoholic beverage from fermented goats milk and Googled "fermented goats milk." Well, there is a tradition of alcoholic beverages involving milk, but more interestingly, and more apropos for my story, was the information I found about kefir.

Kefir is a yogurt-like beverage derived from fermenting milk with a kefir grain (kind of like a slimy cauliflower-looking organism) at room temperature. All you need is some milk, some grains and a jar. Kefir is supposed to be full of pro-biotics and even more beneficial to your digestive tract than yogurt. Also, according to a WebMD article I read, kefir reduces the lactose content of milk so that lactose intolerant people like me can drink it. I thought I'd give it a try so I went to the health food stores we have here in town. I found kefir for sale in the dairy section but wanted to make my own. For research purposes for my story, I bought one quart of goat's milk and the powdered form of kefir pictured above for a total of $10. I had to boil the milk first, according to the package directions, let it cool, and then inoculate the milk with one of the powdered packets. Then I poured it into a clean Mason jar (thanks Mom!) and let it sit on the counter for 24 hours. It looked exactly the same to me the next morning, I have to say. But I refrigerated it for 8 hours according to the instruction and drank a glass.

First reaction? My mouth did not want to swallow. Everything in me was screaming, "Sour milk! Spit it out!" But then, when I did get it down, it was pretty good. Not a glowing recommendation for taste, I know. But I have to be honest. The description of it being like a liquid yogurt was pretty dead on for this batch. The after taste was better than the first impression. I can see mixing it with a little honey or making it into a berry smoothie for breakfast.

Now all the research I did on kefir on-line said that the powdered form and all the commercial versions you get at the stores are not the real deal. You don't get the same health benefits due to the way they have to process it in order to sell it, and it can be quite expensive. On the other hand, if you can get a hold of some real kefir grains (I found a lady in Ohio who will ship them to you for a flat $20) you'll have kefir as long as you give it milk to eat. So I'm going to try that next. Also to try: cow's milk. I have some Lactaid on hand just in case my science experiment goes awry. :-)

Oh, and BTW: Happy Thanksgiving all! I have debated about whether to post a Thanksgiving recipe but as I have gotten off scot-free from having to make anything other than a dessert this year it seemed like sheer hypocrisy. A few things I'm thankful for this year: my Feeding Four family and friends, my Kitchenaid mixer, and dark chocolate. Oh and not having to make Thanksgiving dinner. Thank you Aunt Jennifer!

P.S. I originally titled this post "Kefir Culture" because there is a quite an interesting following to kefir. Just wanted to reassure you that I'm not moving to a commune or actually starting my own goat farm. Yet.

Quick Scones


I can't help but mess with recipes. The Glazed Cranberry Sunrise scones pictured here were based on a recipe from Sandra Lee's Semi-homemade show that aired earlier this month. I loved her Mocha Chip version, although I changed it a bit. The adjusted recipe is below. You can get her original recipe on foodnetwork.com. I liked the final result so much that I decided to use it as a template for making other kinds of scones. In addition to the Cranberry Sunrise version I came up with, I tried using 1/4 cup pumpkin puree and pumpkin spice to make a Pumpkin Maple scone. I was not as happy with that version though so didn't bother to post the recipe here. They looked cute but really lacked the good pumpkin flavor and color.

Also, while I was messing with this recipe I spent a writer's weekend at the beach with some friends and needed something quick to make everyone for breakfast. I didn't want to have to haul a ton of ingredients with me in the car and wanted minimal cleanup. So I mixed all the dry ingredients for the mocha scones in bags ahead of time and took coffee and creamer with me. I decided to omit the vanilla since it wasn't convenient. When it came time for breakfast, I brewed the coffee for everyone and whipped up the scones at the same time. They were a big hit and super easy. You could do this at home and keep them on hand in the pantry for Saturday mornings. Just add your liquids and egg and you're all set.

One last hint on shaping the scones. I used more like 3 cups of the baking mix. Otherwise, I found them to be too dry and crumbly. Sandra Lee had a great hint to press the dough down into a 9" cake pan and then tap it out onto the counter and cut the scones. Her recipe also called for cutting the scones into 12 slices but I like the nice big scones you get when you make eight.

Glazed Mocha Chip Pecan Scones
*Cranberry Sunrise scone alternative below
  • 1/4 cup strong brewed coffee, cooled
  • 2 tablespoons heavy cream
  • 1 large egg lightly beaten
  • 1 teaspoon vanilla extract
  • 3- 3 1/2 cups baking mix
  • 1/2 cup sugar
  • 1/2 cup chocolate chips
  • 1/2 cup chopped pecans
Glaze:
  • 1/2 cup powdered sugar
  • strong coffee, cooled
1.) Preheat oven to 350 degrees F.
2.) In a small bowl, combine coffee, cream, 1 egg, and vanilla; set aside.
3.) In a large mixing bowl, combine baking mix, sugar, chocolate chips and pecans.
4.) Add wet ingredients to dry ingredients and work into a crumbly dough. On a lightly floured surface, form dough into a 9-inch disk (approximately 1/2-inch thick). Cut into 8 wedges and place on ungreased baking sheet. Bake for 18-20 minutes. Let cool.
5.) For the glaze, add cooled coffee one tablespoon at a time to the powdered sugar until a thick glaze is formed. Drizzle on scones. When the glaze has set slightly, lift the scones and rub the bottoms in the excess glaze that has run off onto the pan. Let set before serving.

To transform this recipe, replace the coffee in the scones recipe with 1 Tb orange juice concentrate and enough water to make 1/4 cup. Replace the chocolate chips with dried cranberries and the pecans with chopped walnuts. For the glaze, use orange juice in place of the coffee. For a richer glaze, alternate the o.j. with cream until you get the right consistency.

Sunday, November 14, 2010

A Wine for All Seasons: Brachetto D'Acqui


I'm in love with this wine. I followed my toddler into a Total Wine store a few weeks back (Don't ask; when he takes off I just follow). While I was trying to keep Ben from breaking everything in sight, I talked to a clerk about a beautiful red wine I had a few years ago. "It was a sparkling red," I said, wracking my brain for more information. The clerk's eyes brightened and he said, "Oh, the Brachetto D'Acqui. It's Italian, and they only make it in the early spring and fall." He hurried off and brought me back a big, beautiful bottle for a mere $16. (OK, that's more than I usually spend too, but it was for an anniversary party). Wow! is all I can say. This red wine is a crowd pleaser. I'm no sommelier, so I'll just repeat a summer 2006 review from wineloverspage.com:

Brachetto has wonderful aromas of black raspberry and black cherry with notes of tar, clove and flowers such as violets or orchids. The wine is medium-bodied, generally with a trace of sweetness (a few are medium-sweet) and is usually lightly sparkling or what the Italians call frizzante. If that doesn't sound appealing enough, consider this; alcohol is low, usually 5.5 percent!

The great thing about this wine is its versatility. You can serve it with turkey or dessert or even with appetizers for New Years in place of some Asti and before the champagne. Want to take a bottle of wine to your hostess at a party? Brachetto D'Acqui will please white wine drinkers with its gentle sweetness, and the deep, ruby-red color will entice red wine drinkers to give it a try. Even a wine snob will be impressed with your good taste. Rich and I have a Christmas tradition of popping a bottle of champagne after the kids have gone to bed on Christmas Eve. I think we might just skip the champagne this year and go with one of these sweeties instead. Sante!

Tuesday, November 9, 2010

Almond & Anise Tea Cookies


Necessity is the mother of all invention. These cookies came about as I was trying to make traditional aniseed biscotti one night. I was home alone with the kids and in my pajamas. I already mixed the butter, almond flavoring and sugar together when I realized I was short one egg. Yeah, I thought, I could grab an egg from the neighbors but then I'd have to put a bra on. So instead, I dug out an old recipe for anise refrigerator cookies, doubled it, added in my toasted almonds and came up with these.

The aniseed gives a fragrant licorice background to the warm almonds in every tender bite. But like biscotti, Almond & Anise Tea cookies go great with the hot beverage of choice and hold up well over time. I made mine the week before last and enjoyed one with coffee tonight after dinner. Still yummy. When you double the recipe (as I have below) you have enough to mail off to loved ones for the holidays. These cookies can take the jostling, so share the love.

You don't have to love licorice to like these cookies. I made these for my hubby, who loves licorice, but I love them too. You can grind the aniseed in your food processor for a stronger licorice flavor and lighter texture. I liked the milder flavor and chewy texture of the whole seeds against the crunch of the toasted almonds. I purchased my seeds at a spice store at our local flea market. You might find it in the grocery store or you can get it at Penzey's Spices online. Or email me. I have a big tub of it and am happy to share.

Almond & Anise Tea Cookies
1 cup butter
2 cups sugar
2 Tb almond flavoring
2 eggs beaten
4 tsp aniseed
3 1/2 cups flour (I use a mix of whole and white wheat)
1/2 tsp salt
3 tsp baking powder
1 cup slivered almonds, lightly toasted and cooled

1.) Blend butter, sugar and almond flavoring.
2.) Add beaten eggs and aniseed.
3.) Mix flour, salt and baking powder in separate bowl and add in batches to wet mix.
4.) Mix in slivered almonds by hand.

5.) Separate dough into thirds. Place each third on a sheet of plastic wrap, parchment paper or wax paper. Form into a log and seal. Refrigerate one hour or overnight.

6.) When chilled, slice in 1/2 inch pieces and bake 400', 10 minutes. Makes 3-3 1/2 dozen cookies.

One last meal for the grill


Fall is here. The leaves are gorgeous and the nights are cool. I'm saying farewell to summer and all those fresh veggies with one last summer-time meal for the grill. We have an extended grilling season here in NC that's defined more by when our propane tank runs out than the weather. So far we're good.

This recipe comes from one of this year's issues of Better Homes & Gardens. I promise lots of fall recipes are on their way. This is baking season and it will be bye-bye veggies and hello baked goods!

Artichoke Flatbread
4 whole wheat flatbreads
2 Tb olive oil
6 cups fresh baby spinach
6 oz. herb goat cheese
14 oz. can artichoke hearts, quartered
1 chopped tomato
sea salt fresh cracked pepper to taste

1.) Brush the flatbreads on both sides with oil. Grill lightly to warm on both sides.
2.) Divide remaining ingredients between each flatbread.
3.) Return to grill for two minutes or until bottoms are browned and toppings are heated through.
4.) Season with salt and pepper.

Saturday, November 6, 2010

2010 Disney Food & Wine Festival


It's been a while since I've blogged so this post is a little delayed. Rich and I celebrated our 15-year wedding anniversary back in October while we were at Disney World with family. We had a great trip and Mom and Dad took the kids for a day so we could enjoy the Food & Wine festival in EPCOT. Coincidentally it was also the festival's 15th wedding anniversary, so we got a picture of us taken in front of a "15" sign. Not my best photo, but the only one we have. :-)

So the Food & Wine Festival takes place in the World's Showcase part of the park, where many countries from around the world are featured. Each country had a kiosk or two with appetizer-size portions of food from that region. In the photo above, we were between Mexico and Norway. We sat near a display of Viking relics while sipping a giant Margarita and listening to a mariachi band. Interesting mix.

We didn't actually eat any of the festival food since we dove the EPCOT aquarium at dinner and needed a substantial meal to carry us through. Instead, we enjoyed lunch at the Chefs de France, our favorite EPCOT restaurant. We started the meal with champagne and escargot. Typical of me, I ate it faster than I could remember to take a photo. Scrumptious. Then I had a vegetable lasagna made with crepes while Rich had their gooey baked macaroni and cheese. We ended the meal with creme brulee and profiteroles. Yumm. Great way to celebrate 15 years and highly recommend it to anyone else.

Friday, September 24, 2010

Freezer Meals: ground hamburger/turkey, split chicken breasts


Uh, yeah, that's not actually what my freezer looks like. But I can dream.

Something happens to me this time of year. I start nesting. No, I'm not pregnant, but it does feel similar. Now that at least the nights are cooler, I am compelled to cook mass quantities of comfort food and stockpile them in the freezer. Not that we're in danger of being snowed in any time soon. Case in point: we had a high of mid-nineties today. Still, nature is telling me it's time to prepare for winter... that and I'm just tired of cooking dinner every night.

So this week I bought $30 worth of meat: a three-pound package of 80/20 ground beef, four pounds of ground turkey and 15 pounds of split chicken breasts ($.86/lb at Food Lion). I started cooking and here's what I came up with:
  • 1 small dish of Taco Bake Pasta
  • 1 large pan of Taco Bake Pasta
  • 2 dozen Italian beef/turkey meatballs
  • 2 small Italian meatloafs
  • 1 quart-sized bag of taco meat w/ black beans for tacos
  • 2 small beef and bean taco braids (along with two ham, cheese and asparagus braids)
  • 1 gallon bag of poached chicken breasts, chopped (to add to future meals and for the boys to eat on nights that they don't like what I make)
  • 1 dozen or so marinated (lemon garlic) and grilled chicken breasts (to eat as-is and to add to salads etc.)
  • 2 dozen breaded and baked chicken fingers
And now we're eating out for the rest of the week. Just kidding. In case you think I spent two days cooking, let me reassure you that it's easy to to cook this amount of meals in the same time it takes to make dinner each night. Well, maybe not easy, but it is doable. I started by browning three pounds of ground beef/turkey mix and adding taco seasoning Monday night. Then I used the taco mix to make the taco bake, which we ate for dinner. Tuesday, we had taco salad for dinner and I made the yeast dough for the beef braids and put it in the fridge for the next day. Wednesday, I used the rest of the taco beef for the beef braids and froze a quart of the leftovers for tacos another week. I also mixed the remaining ground beef/turkey in a bowl with an egg, some parmesan cheese, salt, pepper and Italian seasonings and shaped it into meatballs and meatloaf. Thursday, I tackled the chicken. I used a knife to cut one large breast and one chicken "fingerling" away from the bone. I poached a third of the chicken breasts and put the rest in marinade. We ate two of the marinated chicken breasts for dinner and some of the poached chicken for the kids. Tonight, I'll bread and bake the chicken fingers, and we'll eat some and freeze the rest.

A few tips on freezing food. I try to cook and cool everything first. That way, you can just take it out of the freezer the night before and cook it up or serve it room temperature (like the grilled chicken breasts). Just don't overcook or grill your meat so it's not too dry after being frozen and reheated. Individual items like meatballs are great frozen on a tray and then placed in a freezer bag so they don't stick together. I also try to cook small amounts of a lot of different kinds of food. Even family favorites like lasagna get dull when you have them every week. For something like a beef braid, wrap in foil first, label, then seal in a freezer bag. Defrost your meals in the fridge over a day or two or bake them frozen.

Recipes for the beef and ham and cheddar asparagus braid will follow. Other freezer items I typically tackle this time of year are big batches of my MIL's awesome marinara recipe, lasagna, gnocchi and pumpkin muffins. Stay tuned!

Tuesday, September 14, 2010

Feed a crowd with four chicken breasts


Sometimes dinner is more of a come-and-go event than a sit down occasion. Take last Monday night at our house for example. We normally eat early, around 5 p.m., but I had a vet appointment at 5 p.m. and my MIL came to watch the kids. Rich didn't get home for dinner until late. So I needed something that everyone could customize to their tastes and that would hold up over a couple of hours and still taste good. And I needed a lot of it, since a good friend stopped by at the same time with her boys, who wanted some too (veggies always look better at other people's houses). This chopped salad met all of the above requirements and then some. I served it with a pan of hot rolls and had leftovers for lunch the next day. It was a great way to stretch four chicken breasts to feed a crowd.

The idea and Greek dressing recipe are modified from the Spring 2008 special publication by Fine Cooking magazine called Fresh. If you're actually all sitting down to eat at the same time and everyone likes the dressing, you can toss each item in some dressing and arrange in neat, separated piles on top of a bed of lettuce. Beautiful. Of course, leftovers will be soggy so eat up.

Also, the anchovies in the dressing are awesome. They provide a little umami for your tongue without the fishiness. If you're worried the anchovy will be too strong, start with one or two fillets and freeze the rest for later. And try to keep all of the pieces of veggies about the same size--1/2" cubes--with the exception of the chicken.

Help-Yourself Chopped Greek Chicken Salad

Dressing:
  • 1/2 cup olive oil
  • 1/4 cup fresh lemon juice (about 1 lemon)
  • 1 tsp Dijon mustard
  • 2 mashed anchovy fillets
  • salt and pepper
  • pinch of sugar
Salad:
  • 1 block feta cheese (like Athenos) chopped in cubes
  • handful of Kalamata olives, pitted and cut in half
  • 4 chicken breasts, cut in strips
  • 2 cucumbers, peeled and diced
  • 1 red bell pepper
  • 2 vine ripe tomatoes
  • 1/2 purple onion
  • small handful parsley
  • 1 large clamshell of mixed herb greens
1.) Combine the dressing ingredients in a bowl (I used a measuring cup since I could pour the dressing from it and didn't need anything fancy). Mash the anchovies well and whisk it all together. Let sit to blend flavors while you assemble the salad.
2.) Heat 1 Tb olive oil in a pan and season the chicken breasts, both sides, with salt and pepper. Fry until brown and cooked through. Let cool and slice into strips.
3.) Chop the veggies and cheese in consistent 1/2" pieces. Put each item in its own bowl. Serve.

Thursday, September 9, 2010

Simple Dessert: Chocolate Hazelnut Crostata


Recently, I ran out of room on my cookbook shelf. I decided to comb through all of the magazines I've been saving for the past 15 years, pull out any recipes I actually wanted to make, and discard the rest. I couldn't believe all the room I had on my shelf when I was done! Life has changed big time since having kids, and many recipes I had saved no longer fit my lifestyle. As I trashed magazine after magazine, I recalled my grand plans for serving magnificent meals to friends and family. Then, entertaining was an event that involved an entire day of cleaning, cooking and planning, not to mention a week of menu planni ng and shopping. These days I'm lucky to find time to swish the brush around the commode and load the dishwasher before the doorbell rings. And if you're a really good friend, and I feel very comfortable with you (a.k.a. I've seen your dirty laundry too) I won't even bother with that. Because I know you'll love me anyway.

When I finished sorting, I only had five recipes in my hand--most of them involving chocolate. This recipe for a crostata was first on my list to try. The recipe came from a fantastic article from the November-December 2007 issue of Italian Cooking & Living -- a magazine that I believe has since gone to glossy heaven. The recipe is easy enough to bake on a weeknight and the finished product is pretty enough to serve to company.

The IC&L article gives step-by-step illustrated instructions on how to make a crostata, a history of crostatas and a half dozen variations on the dessert, as well as instructions on how to make the dough by hand, in a food processor or a stand mixer. The Type A in me groans in ecstasy at their thoroughness. The creative side of me decides to ignore their exact instructions and change it up just a little. The blogger in me thinks that I may be posting two other versions of this in the future--one with raspberry jam and one with peaches, apples or pears.

For now, however, here are the instructions and photos (inspired by IC&L's article) for making Chocolate Hazelnut Crostata. Lincoln helped me roll out the dough and make snakes for the crust, both things he's used to doing with play dough. And everyone helped eat it. Nutella is on sale at Harris Teeter right now. A sidenote: As much as I enjoy the taste of Nutella, those commercials about spreading it on whole grain toast for yor kids to eat a healthy breakfast just tick me off. Let's call sugar, sugar and not try to pass it off as health food. This crostata does not count toward your nutritious breakfast. :-) Just enjoy it and share with a friend.

Chocolate Hazelnut Crostata

Nutella hazelnut spread
1/4 cup chopped hazelnuts, toasted

Basic Pasta Frolla (a sweet pastry dough):
1 egg
1 egg yolk (save the egg whites to brush over the dough before baking for a lovely sheen)
2 1/4 cups flour
1 stick unsalted butter, chilled and cubed
1/3 cup plus 1 Tb sugar
1/8 tsp salt
grated zest of 1 lemon

1.) I used a food processor to pulse all of the above ingredients until a ball formed. You can also do the dough by hand, kneading it a few seconds to pull it together, or use a hand or stand mixer.
2.) Transfer dough to a sheet of plastic wrap, rolling it into a ball and then pressing down to make a flat disk. Refrigerate 30+ minutes.
3.) Working quickly, transfer the dough to a floured sheet of parchment paper and roll into a 1/4 inch thick circle with a floured rolling pin.

4.) Using a medium-sized pan lid, cut out an even circle. Gather up the extra dough and put it in the freezer to stay cool while you do step 5. This dough gets sticky if it doesn't stay cold.
5.) Spread a large dollop of Nutella over the base. Set aside.

6.) Roll out leftover dough on a separate piece of floured parchment and use a pizza cutter or knife to square off the dough. Cut 8-10 long strips for the lattice top. Gather up leftover dough and put in the freezer while you do step 7.

7.) Place half of the strips across the dough one way. Crisscross the other strips on top to form the lattice. Trim the excess off the edges with your pizza cutter.

8.) Gather up any leftover dough and roll into snakes on a floured surface. Lay the snakes along the edge of the crostata forming a crust. Press gently with your fingers to seal to the layers of dough underneath.

9.) Beat the egg white and gently brush onto the lattice work and crust.
10.) Top with toasted hazelnuts.
11.) Bake on the parchment paper on a pan or baking stone in the oven at 375' for 35 minutes.
12.) Serve hot with a small scoop of vanilla ice cream or cooled by itself. Serves 6.

Saturday, September 4, 2010

The Art & Soul of Chocolate: Escazu Chocolates Tour


Chocolate. What can I say that hasn't already been said? I gladly embrace life with a few extra pounds just to have my daily dose of it. And when it's the good stuff, like the handmade chocolates by Escazu Artisan Chocolates, a little goes a long way. Rich and I have been a fan of Escazu since they had a small shop in Glenwood South but then they moved somewhere on the north side of the city. We spent one night driving in the dark into some interesting neighborhoods looking for them and finally gave up. Luckily, I was on their e-mail list and when they reopened on N. Blount Street, we skedaddled over to get our fix. The new shop is a little roomier but with the same Ikea furniture. They've added a glass window with a view behind the scenes into the chocolate-making process. And now they're also offering tours.

Escazu tours are available on the first Friday and Saturday of every month. They're free but you'll need to make a reservation. The cozy shop can only accommodate a limited number of visitors, so spots book up fast. I made my reservation a month in advance because we missed out on the first set of tours in August. My friend Sandi and I had a light dinner at Market Restaurant next door, and then joined in on the tour in progress. The tour lasted about 30 minutes and we were able to see the chocolate in all it's different stages. Escazu actually buys their beans from small farmers in Central/South America, hand sorts them, roasts them in a giant metal ball at a low temperature, tempers them and crafts them into bars and individual filled creations. They even hand wrap their bars. We tasted the chocolate at three different stages, including the cocoa nibs, then queued up for hot cocoa and chocolates to end the tour.

The spicy hot cocoa was divine. We also sampled four or five chocolates, which they cut in half for us to share. The chocolates are around $2 a piece, which adds up quickly. But really, any more of these chocolates in one sitting is asking for insomnia. It's like drinking an espresso before bedtime. My favorite flavors from last night include the caramel (top right), goat's milk ganache (bottom center) and dark chocolate basil (sorry, that one disappeared before I could get a photo). Sandi also really liked the white chocolate raspberry (left), although we couldn't find any hint of white chocolate in it. I think it was mislabeled. I've tasted their bars in the past and really prefer these tiny, potent creations. I'm hoping in the future they'll also add a chocolate tasting (for a fee of course), kind of like a wine tasting but with flights of single-source chocolates so you can taste the differences. I think I would need a designated driver.

A word if you're planning a girl's night to Escazu or Market Restaurant: parking in front is limited to five or six spots but there's plenty of parking on the street, and it's well lit. I'm not familiar with the neighborhood, so don't know how safe it is. We came out after dark and there were two groups of men hanging out across the street and behind the restaurant near some rundown looking apartments. Both areas were poorly lit. It was late and we were glad we'd parked under a streetlight close to the restaurant. Overall, I wouldn't let it deter you from a visit. Just be aware of your surroundings if you'll be coming out of the building after dark.

Also, it was a beautiful night to sit out on the patio at Market Restaurant and enjoy a pitcher of sangria and some ceviche and crab cakes. The food was light and fresh, a good prequel to Escazu. If I lived in the upscale townhouses across the street I'd be there a few nights a week, although I wouldn't drive across town for it. Of course, they're one of the few places I've seen goat on the menu locally, even if they were out of it last night. I'm sure we'll be back.

Thursday, September 2, 2010

Make-do Meal: Fritata


I love a meal that saves me money and a trip to the grocery store for that inevitable missing key ingredient. A fritata does all that, looks fancy and is healthy and super easy too. I'm not even going to post a recipe, because it's all about making do with what you have on hand. For the version pictured above, I used:
  • 1 cup shredded zucchini (leftover from making muffins)
  • 1 red pepper (found in the crisper drawer that wasn't going to make it another day)
  • 2 pieces of deli baby Swiss cheese (on sale that week and purchased for grilled cheese)
  • 1/2 cup shredded ham (leftover from the bone of a ham I baked Sunday)
  • 2 green onions (leftover from a stroganoff recipe)
  • 5 eggs
  • 1/4 cup milk
  • salt & pepper to taste
But the variations are endless:
  • ham, broccoli & Cheddar
  • onion & potato
  • asparagus & feta
  • tomato & goat cheese
  • you get the idea...
If you're adding fresh veggies, saute them first in a little oil. This will draw out any excess moisture and make sure you have tender-crisp and not undercooked, crunchy veggies. Then scramble the eggs in a separate bowl with the milk and pour it over top of the veggies in the hot pan, mixing in any cheese you want to add.

Cooking a fritata: You can cook a fritata two different ways, depending on what kind of pan you want to use.
  • Nonstick pan-- cook on medium, scraping the sides toward the center gently with a plastic spatula. When the egg is fairly set (8-10 minutes) jiggle it until you're sure it's loose from the bottom of the pan. When you're ready, flip the fritata out onto a large plate, so it's raw side down, then slide it back into the pan to finish cooking, another 5-8 minutes. It's ready when you poke a hole in the middle and you don't see runny egg oozing out (make sure you're not looking at melted cheese). I saw this method on Rachel Ray's cooking show and gave it a try for the first time. The presentation is nice and you don't have to heat the oven.
  • Cast iron or Iron-clad--Any kind of pan that's oven proof is great too. You won't get that lovely fritata to slide out on a plate but it will still look great. And hey, one less dish to do. Cook the fritata the 8-10 minutes while you preheat the oven to 400'. When it's fairly well set (read: not too jiggly or watery looking), pop onto a rack set high near the broiler in the oven. Bake until it's puffy and golden brown on top.
If you have kids (like my preschooler) who won't eat everything all mixed together, you can also easily set aside the basic ingredients--scrambled eggs, meat, raw or sauteed veggies--and still have a complete meal. Add a fruit or green salad and you're all set. Luckily, we don't all have to eat like preschoolers. :-) Rich, the baby, and I ate it as is. I was thinking next time it would be good with crusty bread and some fresh tomato bruschetta too. Top it off with a little shaved parm to make it extra fancy.

Sunday, August 29, 2010

(World's Largest) Zucchini Chocolate Chip Bread


Grandma and Grandpa Russell visited recently and left us with loads of fresh veggies from their garden, including this impressive specimen. After roasted zucchini and grilled zucchini, it was time for my favorite variation--chocolate chip zucchini bread. I had to spoon out some of this particular zucchini's seeds, which were as big as a pumpkin's, but then it shredded easily in my Cuisinart food processor. This one giant zucchini yielded 10 full cups. This recipe uses 3 cups of shredded zucchini per batch, which is great if you're swimming in zucchini in your garden right now. I also substituted some whole wheat flour for white flour and applesauce for oil. A double recipe made two loaves of bread and three dozen average-sized muffins. The finished product is dense but moist and soft. They also freeze and reheat well and are a great way to get little ones to eat their veggies. Ben, my baby, only has four teeth for chewing but refuses pureed veggies so these are great (I pick out some of the chocolate chips so he's not getting too much sugar). And I love them in the morning with a hot cup of coffee. I've got a couple dozen in the freezer now so will be enjoying them into this fall as the weather (hopefully!) gets cooler.

Chocolate Chip Zucchini Bread (or muffins)
6 eggs
1 cup white sugar
1 cup brown sugar
3 tsp vanilla
1 cup canola oil
1 cup unsweetened apple sauce
6 cups grated zucchini
1 1/2 tsp salt
2 tsp baking soda
3 tsp cinnamon
2 cups whole wheat flour
4 cups white flour
3 cups semisweet chocolate chips

1.) Preheat oven to 350'. Grease two bread pans and line with parchment paper, greasing the parchment paper as well. Line with paper cups or grease three, dozen muffin pans. I prefer muffins over loaves since I can take just one muffin out of the freezer for myself instead of having to wait for a whole loaf to thaw. But loaves are nicer to give away to friends or to bring out for company.
2.) In a large mixing bowl, mix eggs, sugars, vanilla, oil and applesauce.
3.) Add zucchini to wet mix.
4.) In a separate bowl mix all dry ingredients minus chocolate chips. Add dry to wet mix in batches.
5.) Fold in chocolate chips with rubber spatula, scraping bottom and sides of bowl and beater as you work.
6.) Pour out batter into bread pans and muffin tins.
7.) Bake muffins 17-20 minutes. Bake loaves 45-50 minutes.
8.) When cool, turn out of pans. Freeze in bags or store in airtight containers a few days.

Friday, August 20, 2010

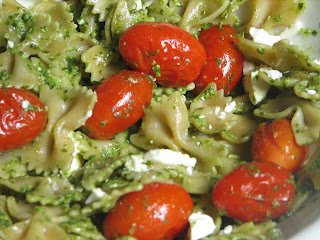
Roasted Tomatoes with Feta and Pesto Farfalle


Phew. Sorry it's taken me so long to get up such a simple recipe. Seems a little anticlimactic. If you had a chance to make pesto or see some in the freshly-prepared section of your grocery store here's a quick, easy dinner or lunch. I wasn't sure how Lincoln, my almost-five-year-old, would take to pesto, but he asks for green pasta for dinner three out of five nights. Which is good since I used up the rest of my basil in the garden this week to make more. This stuff is like gold though with the ingredients--fresh basil, olive oil, fresh grated Parmesan cheese and pignoli aren't the cheapest things in the store. Luckily, the flavors are so intense a little goes a long way. If you have some leftover grilled or rotisserie chicken from a previous meal, that would go great in here too.

Roasted Tomatoes with Feta and Pesto Farfalle
5 cups farfalle, cooked and drained, still hot
5 Tb pesto
1 small package grape tomatoes
feta cheese crumbles
oil, salt, pepper

Wash grape tomatoes and toss in 1 Tb olive oil. Season with salt and pepper. Roast in the oven at 400' for 10 minutes or so, until they split and pop and start to darken. Remove from the oven. Toss the pasta in the pesto lightly to coat. Add the grape tomatoes and toss. Add feta cheese to taste and toss very lightly. Salt and pepper to taste.

Friday, August 6, 2010

Harvest that basil--pesto


The last few years I've planted basil and I've always been disappointed...because I underestimate how much I'm going to want! You don't need a lot of ingredients to make food taste good when you have fresh herbs like basil on hand. And Lincoln will eat anything if it has fresh basil from the garden on it. In fact, I tell him some things are basil just because they're green to get him to eat them. I know, I know. You gotta do what you gotta do.

That said, all good things must come to an end. With dry August heat and the leaves getting bigger (and therefore starting to tend toward bitterness), and some plants going to seed, I decided it was pesto-making season. So here's my recipe for making pesto. If you don't have 8 cups of basil leaves on hand, you can easily modify this to what you do have around. If you don't have pine nuts (also called pignoli on some labels), you can use walnuts, although I'd play with the ratios since walnuts to me can have a stronger flavor. You can also leave out nuts altogether. Toasting the pignoli ahead for just a minute or two until brown wakens their flavor and texture. Fresh lemons are best.

Take care to wash your basil well since none of this is cooked and you'll be eating it basically raw. I found some interesting critters curled up inside my leaves. There are better ways to get your protein! Unless, of course, you're trying out for that survivor guy show.

Recipes for what to do with your pesto will follow.

Pesto
8 cups fresh basil (lightly packed into the cup)
2/3 cup fresh grated parmesan
1/3 cup pine nuts, lightly toasted
3 garlic cloves
juice of two lemons
1 Tb of sea salt
approximately 8 Tb of olive oil

1.) Harvest the largest stalks of basil, leaving any smaller stalks for tomato salad for the rest of the summer. :-)
2.) Thoroughly rinse each stalk and leaf with cold water, removing damaged leaves and garden pests.
3.) Remove the leaves, discarding any of the woody stalks in a grocery bag with the damaged leaves and pests (I seal these up at the end and toss them in the outside trash so no little nature visitors surprise me in my kitchen later).
4.) Thoroughly dry by rolling in a clean kitchen towel, pinching together the ends and shaking out excess water. Use a second dry towel, repeating the process if needed.
5.) Meanwhile, lightly toast your pine nuts. You can also omit them or use walnuts. Juice your lemons and measure out your olive oil and cheese. Peel your garlic.
6.) Begin to pack as much of the basil into your food processor as you can, using the chopping blade. Pulse until you break down some of the leaves and can fit in all 8 cups of the basil. You can start adding the lemon juice and olive oil to help the process.

8.) Toss in all remaining ingredients and pulse until a smooth consistency. If it's too dry, add a LITTLE more oil, 1 tsp at a time. You can't go back once you add too much oil and in my mind there's nothing worse than oily pesto.
9.) To freeze, spoon the pesto into ice cube trays (each slot is about 1 Tablespoon of pesto). Cover with plastic wrap, pressing the wrap down into the pesto to keep it from discoloration or freezer burn.
10.) When frozen, turn out into a freezer bag, label and store away to use later. Makes about 18 Tbs.

Sorry, could not get this durn picture to rotate in photo imager. Probably a user error. :-)

Saturday, July 31, 2010

Foodie Family Road Trip: Hershey Chocolate World


On a recent trip to visit family in Upstate New York, I took the boys on a side trip to Hershey, PA. Even though I grew up a few short hours from Hershey Park, I'd never been. I suspected that the amusement park itself would be too much--for the boys, me, and the budget. But then I read about Hershey Chocolate World and decided it was just our speed.

Hershey Chocolate World is located just outside the gates of the amusement park, about a 10-minute drive off I-81, through some pretty dairy farm country. Parking was free for the first three hours and they opened at 9am. The timing was perfect for us, as we had just eaten breakfast and checked out of the hotel, and it wasn't that far out of our way. Admission to Chocolate World is also free, although if your kids are old enough to know better Hershey's has plenty of temptations inside to lighten your pocket book. My almost-five-year-old was blissfully ignorant of the other paid attractions and was more than satisfied to do the free 'factory' tour twice--so long as he got the free mini-Hershey bar at the end and was able to pick out a treat from the gift shop. My one-year-old was also wide-eyed by the tour, with its Disney-ish theatrical style; animatronic, singing cows; and amusement-park ride car. Also like Disney, they dump you out in the gift shop. :-)

If you're looking for a real factory tour, you'll be disappointed, but little ones will love it. I bet teenagers will get a kick out of it too, although they might not tell their friends. Also available besides the free tour: a 3-D adventure, Make-Your-Own Chocolate Bar experience ($15 a pop and they charge every member of your party), and a Trolley tour. All looked like fun for another day, especially for older kids.

My only complaint was that they made us leave our stroller outside, and since I was on my own, it made it more difficult to get around. Note to the world at large: If you see a woman lugging a baby and a preschooler through a chocolate factory, hold the d--n door! Also, full disclosure: I believe very strongly that the only good Hershey bar is one served with roasted marshmallows and graham crackers, but the tour does make you feel good about supporting dairy farmers. Also, the animatronic cows seemed happy. I do have a soft spot for York Peppermint Patties and their dark chocolate bars with the nuts and berries. Both boys will apparently eat anything that starts with an H and ends with -ershey.

I see many more stops at Chocolate World in our future. Maybe next time we're up that way we'll give the museum a shot (A shuttle will take you to the museum from the Chocolate World parking lot) or Hershey gardens. Lots of fun photo ops; smelled great; low cost; and we were back on the road in time to miss the morning commuter traffic. See you next year, Chocolate World!

Foodie Read: The Particular Sadness of Lemon Cake


To pass the time on a l-o-o-n-g road trip recently (Read: driving four days, two kids, just me.), I checked out my first e-audio book from the library. How cool is this? If you haven't already, go to your library's on-line site and see if they have a digital media section or--gasp!--talk to your librarian. I downloaded 'Lemon Cake' to my computer and then uploaded it to my iPod for the trip with only minimal help from my techie husband. Very easy and FREE. Can't beat it. And if I'm way behind on the times here, sorry. They must not have advertised it on NOGGIN. :-)

So, what's the book about? I can't tell you yet. Because I can't stop myself from talking about the cover. The first thing I thought when I saw the cover was, "Hey, wait, that's a chocolate frosted yellow cake. Who in their right mind would frost a lemon cake with chocolate frosting? Seems like a waste of perfectly good lemon cake...and chocolate frosting." Actually, the mom in this book does make such a cake for her daughter, Rose, for her ninth birthday. And when Rose tastes the cake she is awakened to an uncanny ability to taste her mother's emotions through her food. The book, set in Los Angeles, follows Rose's development as she learns to live with and finally embrace and use her strange ability. She eventually discovers, however, that she's not the only member of her family with special skills.

The charm of 'Lemon Cake' is not necessarily the exciting plot or sparkling prose. I confess to being a scanner, and I hit the FF button a couple of times during the first half of this e-book. (Life is short; don't waste it reading bad prose or dull story lines.) But as Rose grew, I became more interested in her life, her brother's strange disappearances, and her ever-so-slightly deepening relationship with her dad. Of course at one point I wondered if she only ate the food of very depressed, angry, annoying people. Apparently not many happy cooks or chefs or, for that matter, people in L.A. But by the final chapters, when my iPod died and I was still two hours from home, I found myself rifling desperately through the suitcase in the trunk looking for my charger. I even unplugged the kids' movie and listened to the whining and ranting for the last 30 minutes just so I could find out how it would end. And that, my friend, is the best compliment I can give a book.

So, chocolate iced lemon cake...really? Any one? Am I alone in this?
Related Posts Plugin for WordPress, Blogger...