Friday, December 23, 2011

Holiday Cheer Sangria


Here’s a holiday recipe to enjoy with friends and family. Merry Christmas, from our family to yours! May this holiday be filled with Christ’s love, peace and joy in your hearts and memories that will last for years to come. See you in the New Year!

Holiday Cheer SangriaServes 10-12 people

  • 2 bottles of red wine. Pinot, rioja, tempranillo, shiraz or zinfandel all work well. Just use something you like drinking on its own but that doesn’t have too distinct of a flavor. I’d steer clear of say a cabernet. Also, you don’t want to spend too much money since you’re basically making a classy fruit punch with it.
  • 3 oz (two shots) of either brandy or rum (or both if you like). I prefer brandy.
  • Assorted fruit. I used 2 green apples, one large red apple, one lime and two seedless oranges. Sweet, fresh pit fruits like cherries and peaches are yummy too. Of course they’re also out of season right now. I’ve used Maraschino cherries in the past with okay results too. Depends on what you like.
  • 2 liters of seltzer or 2 liters of lemon-lime soda like Sprite if you like your sangria a little sweeter.
 1.) Wash your fruit and core and chop it into a variety of shapes that will look pretty and fit into a wine glass later. Make sure you take out any seeds. Place the fruit in a 1/2 gallon pitcher. Isn’t that pretty?
2.) Pour the two bottles of red wine over the fruit and refrigerate overnight.

3.) Add the rum and/or brandy just before serving, stirring with a spoon to combine.
4.) To serve the sangria, place 1-2 ice cubes in a glass along with a few colorful pieces of fruit. Pour the wine over top and add seltzer water or soda to taste. For a strong drink, add less soda. Avoid adding the soda to the whole pitcher as it goes flat quickly and leaves you with watered down wine by the end of the night.

Friday, December 16, 2011

Candy Cane Cookies and Tuxedo Peppermint Bark


A little more than a week until Christmas! If you’re looking for a way to use candy canes, here are two traditional recipes. One is easy (the bark); the other takes a little more finesse (the cookies). But both are festive and yummy.

Peppermint Bark
1 bag bittersweet or dark chocolate chips (I like Ghirardelli)
1 bag white chocolate chips
12 mini candy canes, semi-crushed (1/3 cup or so)


1.) In the microwave, melt the chocolate chips in two separate bowls on 50% power.
2.) Line a 9”x13” cookie sheet with parchment paper.
2.) Spread the dark chocolate chips on the paper. Dollop and drizzle white chocolate on top and swirl with a knife to get the marbled effect.
3.) Sprinkle with crushed peppermint candies. Press the candy lightly into the chocolate with the back of a clean spoon.
4.) Refrigerate for 30 minutes to harden. Break apart into pieces. Store at room temp or refrigerate.

Candy Cane Cookies
Adapted from Christine’s Cuisine blog post.
2 sticks unsalted butter, softened
1 cup confectioners sugar
1 egg
1 1/2 tsp almond extract
1/4 tsp peppermint extract
2 1/2 cups all-purpose flour
1 tsp salt
Wilton’s No Taste Red food coloring gel

1.) Blend butter, sugar, eggs and almond flavoring.
2.) In a separate bowl, combine flour and salt.
3.) Add the dry mix to the wet mix in batches until combined.
4.) Remove half of the dough from the bowl. Color the remaining dough with the red food coloring and flavor with peppermint extract.
5.) Place each half of dough in separate containers in the fridge. I form the dough into two balls and wrap in Saran Wrap. Let chill overnight if possible. The longer they chill, the easier the dough is to handle. You can also spoon the dough out in small teaspoons on two separate plates and cover with Saran Wrap so they’re ready to go the next day. This might also help the dough chill more quickly if you want to bake the cookies the same day.
6.) Using confectioner’s sugar to coat your work space, roll out a tsp-size white dough ball and one red into 4-inch snakes. (You’ll be surprised at how little dough it takes to get a 4-inch snake.) Pinch the ends together and roll the dough so that the two colors twist like a candy-cane pattern. Place on a parchment-lined baking sheet.
7.) Unwrap and crush enough candy canes to equal about 1/2 cup. You want the candy pretty fine, almost like a sugar consistency with some slightly larger chunks for color. I used about two dozen mini candy canes to achieve the 1/2 cup. The boys had fun crushing them with a rolling pin in a quart-sized freezer bag. Set candy aside.
8.) Bake in a 375’ oven for six to eight minutes.
9.) Immediately remove the cookies from the oven and sprinkle with crushed candy. The candy will melt slightly and adhere to the cookie. Let cool before moving from pan to a wire rack to cool completely. Cookies will be tender with a little candy crunch.

Monday, December 12, 2011

Christmas Tree Cookies

christmtastrees1
I never learn. Several years ago I made the mistake of scheduling my annual physical in January. Stepping on that scale was a big wake up call. Holy cookies and crumb-cakes Bat Man! But this year I’ve done one worse. We have a Caribbean vacation planned for January. As in bikinis and beaches and lots and lots and lots of candid photo opportunities. Yeah


I’d like to say that this has motivated me to find healthier ways to bake, but I’m just too stuck in my ways. Instead, I’m making less of the good stuff. Like these Christmas cookies. We all love these little guys. We love frosting them. We love decorating them. But most of all we love eating them. (Any May I Please Have a Cookie? fans out there?). I’m happy to share the recipe with you though. Does that cut calories?
christmtastrees2
Basic Rolled Sugar Cookies4-5 dozen cookies, depending on the size of your cookie cutter
3 sticks butter, room temp
2 cups sugar
4 eggs
1 tsp almond flavoring
5 cups flour
2 tsp baking powder
1 tsp salt
1.) Cream butter, sugar and eggs.
2.) In separate bowl, mix together dry ingredients and add to wet ingredients in batches.
3.) Cover and chill overnight if you can.
4.) Roll out dough to 1/4” thick and cut in tree shapes. Helps to flour the cookie cutter.
5.) Bake 400’ for 6-8 minutes. Let cool completely and brush away any crumbs before frosting.

In the past I’ve made royal icing, but I’ve returned to good, old-fashioned shortening-based decorator frosting. We just prefer the taste. The frosting sets up overnight, and you can stack them in a container the next day. The hot dots candies help cushion the trees too.

Shortening Decorator Frosting
4 cups confectioner sugar
1/2 cup shortening
5 Tb milk (plus more until right consistency)
1 tsp vanilla
1.) Cream all ingredients together. Add more milk until desired consistency.
2.) For the cookies above I used Wilton’s leaf green food gel.
3.) We love rainbow sprinkles and hot dots for decorating but you can always get fancy too.
4.) Freeze any leftover frosting and re-use it at a later date. You’ll never know the difference.

Just a word about timing. I confess that when I do these cookies every year I usually take a few days. I make the dough one night. Put it away. I bake the cookies off the next day and let them cool. The day after that I make the frosting and we decorate. The next day we eat them all. You get the idea.

Friday, December 2, 2011

Double Chocolate Orange Biscotti

I’ve been cooking and baking like a mad woman lately, which also means I’ve been eating, unfortunately, which means more time at the gym and less time to blog. All excuses aside here’s a little recipe adapted from the brilliant Dave Lebovitz’ “Living the sweet life in Paris” blog. Look here for the original recipe. I came across this recipe on pinterest, a cool little Web page that makes my computer emit a loud time-sucking sound whenever I turn it on. But at least it’s useful. So pin this on your recipe board and bake these biscotti. In that order.
Double Chocolate Orange Biscotti
2 cups flour
3/4 cups cocoa powder
1 tsp cinnamon
1 tsp baking soda
1/4 tsp salt
3 large eggs
1 cup sugar
1 tsp vanilla
1 Tb orange juice concentrate thawed
2 tsp dried orange peel
1 cup sliced almonds
3/4 cups dark chocolate chips
1.) Mix together the flour, cocoa powder, cinnamon, baking soda and salt.
2.) In a separate bowl, mix together the eggs, sugar, vanilla, o.j. concentrate and orange peel.
3.) Add the flour mix to the wet mix in batches.
4.) When combined, mix the almonds and chocolate chips in by hand.
5.) Drop the dough in spoonfuls onto a parchment-lined baking sheet in two long rows. With floured fingers, shape the two rows of dough into narrow, squared off logs. Dust with extra flour for that rustic look or glaze with cream for a more finished look.
6.) Bake for 25 minutes. Remove from oven and let cool completely.
7.) Using a butcher knife and pressing evenly so the biscotti doesn’t crumble, slice the log into 36 pieces.
8.) Arrange the pieces, flat-side down on two baking sheets. Place in the oven and bake for another 8 minutes each side. Let cool before storing.
9.) You can also melt good chocolate and dip the biscotti in the chocolate. The chocolate will harden as it cools. But these were so rich any more chocolate in my mind was overkill.
10.) These will generally keep for a week or two. They don’t usually last longer than that at our house because they get eaten pretty quickly. They’re great with ice cream, a hot cup of coffee or cocoa and especially as a decadent breakfast.
 
During my most recent trip to Penzey's I stocked up on some yummy items for baking. Highly recommend especially the natural cocoa and the Vietnamese Cinnamon. Hugely superior to most of what you find in the stores and well worth the little higher price.

Sunday, November 20, 2011

Need a gong this Thanksgiving


Have you ever felt something so strongly words don't do it justice? I find myself there this Thanksgiving. Listing the things I'm thankful for seems empty and self-serving, like I'm bragging or patting myself on the back. What I really want is a giant gong. Something bronze, preferably with a big hammer. Something loud and resonating. Something that says, "THANK YOU!!!" I don't have a gong, unfortunately. If you want to lend me yours, I'll take good care of it.

So since the internet equivalent to words without words is photos, I'll share one of something I'm grateful for.
Enjoy your Thanksgiving and don't forget to give thanks!

Friday, November 18, 2011

Thankful Things Place Cards

I'm hosting Thanksgiving next week for my husband's family and a few close friends. Because there are so many of us (we're expecting 30+ guests this year) we're usually more of a buffet-style-paper-plate-and-plastic-cup-grab-a-seat-anywhere crowd. We're still serving buffet style, but I thought it would be nice to have place settings at the 11 available seats (8 at my new dining room table and 3 at the kitchen counter). Instead of place cards with guests' names at each seat I made Thankful Things place cards.
Ignore that crumb in the corner. :-) The idea is for each setting to have a different thing we're thankful for. One tag says "Family" another will say "Friends" and another "Health." You get the idea. Okay, I'm not very crafty so I was pretty proud of these. And they were really inexpensive. I used my own wrought iron napkin rings and jazzed them up with the same gold pen I wrote with on the tags and some really inexpensive fall bead thingies from Michael's. (Don't you like my crafting vocabulary?) The "thingies" were 30 cents a piece on sale. I extracted six or seven strands out of each thingy and wrapped them around my napkin rings. Then I used brown thread to tie the gift tags. The gift tags were the most expensive item at $4 a package and the pen cost me about $2. All in all though, not bad. Hopefully the food will look this good!

Friday, November 11, 2011

Stockup Recipe: Crockpot Brown Rice

It's that time of year. I don't know if it's the cold weather or watching the squirrels bury their acorns under the old oak tree in the back yard but suddenly I'm filled with the urge to stockpile food. As I write this my freezer is pretty much empty besides some summer vegetables, old hamburger buns, push-up yogurts, one container of leftover chili and a bread-pan lasagna. However, my pantry is brimming with uncooked staples like rice and beans, so I'm starting there.

This 32 oz. bag of brown rice from Wal-Mart cost me $1.28. It holds 5 cups of dried rice, which equals about 20 cups of cooked rice. For $1.28. That's a heck of a lot of cooked rice, you're right. Here's how I use it. I don't flavor it while it's cooking except for some salt. I used to make big batches of specific types of rice but then we got tired of eating it over and over. So instead, I keep the rice plain and add a little butter and salt or sugar (depending on your preference) at dinner time. I might also add some steamed veggies and flavor it with either beef or chicken bouillon paste and a little water. You can also use it to make:
  • Dirty rice.
  • Fried rice.
  • Rice and beans.
  • Green rice.
  • Stir-fry.
  • Chicken soup or with chili. 
  • Stuffed peppers.
  • Meatloaf mix.
  • Rice pudding.
  • Chicken rice casserole.
  • Crockpot Italian Chicken.
Just a couple of ideas. Rice freezes and reheats nicely. Best of all, when you use your crockpot you just throw it in and forget about it. Thanks to Stephanie O'Dea at A Year of Slow Cooking for a great idea.

Crockpot Brown Rice
32 oz bag of brown rice (5 cups)
10 cups water
1 1/2 Tb sea salt
butter

1.) Butter the bottom and sides of the crockpot.

2.) Add the rice.

3.) Add the water and salt and stir to combine. Cover with lid.

4.) Place the crockpot on the "high" setting and cook for about 3 hours. You'll know it's done when blammo the rice is puffed up to the top of the crockpot, the water is mostly all absorbed and the rice is tender. If there's a little extra water, that's good. Turn off the crockpot and let it finish soaking into the rice. Be careful not to overcook the rice or you'll end up with rice paste.
5.) Fluff the rice with a large spoon and let it cool. You can set the rice aside in the fridge and then bag it up the next day. However, be aware that the rice at the bottom of the pot might cool into a cake because the rice on top is weighing it down. I just broke it up with a big spoon.
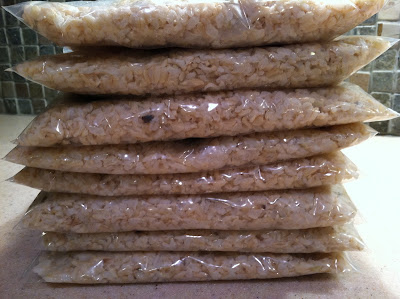
6.) Measure out two cups of rice into a 1 quart freezer bag or container and press out all the air. Label your bag with the date, measurement and item and freeze it for later use. I got 8 bags of rice in the freezer and set aside another 2 cups for dinner that night for a total of 18 cups. Not bad!

Reheating: When it comes time to use that rice, just defrost it a couple of minutes in the microwave inside the bag so that you break up the block of rice into chunks. Transfer to a bowl, discarding the freezer bag, and nuke one minute at a time, fluffing with a fork. You can also add a teaspoon of water if you'd like.

Tuesday, November 8, 2011

French Collapsible Wire Salad Baskets

I'm getting romaine lettuce and even arugula in my Produce Box these days. The leaves are crisp and bright green...and need a good washing. My standby method for cleaning salad greens is to rinse them under cold running water then lay out each leaf on a clean kitchen towel, roll them up jelly-roll style and, grabbing both ends of the towel firmly in one hand, swing the towel back and forth outside. Some people just use a salad spinner but I'm old fashioned like that. Plus I have so many serving platters and gadgets in my kitchen cabinets I don't have room for another bowl.

Enter an old-fangled gadget my Mom used when I was growing up--the french collapsible wire basket. It rinses off easily and lays flat in a drawer and fits an entire head of romaine lettuce. I can spray the lettuce inside the basket then send one of the kids outside to shake it dry. Just like when we were kids. Wait, does that make me my mother?

Earlier in the year when the spring greens were in season I searched everywhere, including online, for one of these beauties without avail. I asked Mom where she got hers. She couldn't remember but she started looking around in my hometown for another. Also no luck. Finally, she just sent me her old basket. "What am I going to do with it?" she said. "I have a salad spinner."
I haven't seen these in stores but if you want to get one I've seen them sold on Amazon and eBay and even etsy as "vintage" French egg or salad baskets. Even if other people have moved on, I personally use my wire basket all the time. At the very least it would look great hanging from a hook in your kitchen.

Saturday, November 5, 2011

Two Uses for Leftover Halloween Candy

Got Halloween candy? Here are a couple of creative ways to use it.
Caramel apples rolled in the kids' favorite candies like M&Ms, candy corn and/or Pop Rocks are always in season. Just follow the directions on the back of a bag of caramels to make them. The kids can help wash and dry the apples and insert the sticks as well as unwrap the caramels and customize their own apples. Careful with the hot caramel though.
My favorite way to use the chocolate candy is these decadent Candy Bar Brownies with Chocolate Peanut Butter Fudge Frosting. And they're so simple.
Candy Bar Brownies with Chocolate Peanut Butter Fudge Frosting

2 cups of chopped assorted candy bars (we used Snickers, Kit-Kat, Crunch, M&Ms, Hershey's White Chocolate Cookie Crunch, regular Hershey's bars, Reese's cups, Milky Way and Three Musketeers)
1 bag of brownie mix (and ingredients according to package)
1/2 cup peanut butter
1/2 bag of chocolate baking chips

Preheat oven according to package instructions and grease an 8"x8" pan with Crisco.
1.) Mix the brownie batter according to the package directions.
2.) Fold in the chopped candy bars.
3.) Spread the batter in the pan and bake according to package instructions. Batter will just barely cover the bottom of the pan but don't worry. It will spread as it bakes.
4.) Bake the brownies according to package instructions and let cool.
5.) Meanwhile, melt the peanut butter and chocolate chips in a bowl, one minute at a time, stirring with a spoon until smooth and combined.
 
6.) Spread the frosting over top of the brownies and place in the fridge for an hour until firm. Cut the brownies into squares and serve. Store in a covered container at room temperature. Mmm...

Thursday, November 3, 2011

Pumpkin-Orange Spice Muffins with Cinnamon Ginger Streusel

Ahh, fall is here. We recently took a car trip from North Carolina up to Connecticut and got to see a virtual, real-time fall season. The leaves were just starting to turn in North Carolina. They were in full glory by Maryland, tapered off in upper Pennsylvania and were at the tail end of the season by Connecticut. Luckily, we saw fall in reverse on the way back and are home in time to enjoy North Carolina in the peak of autumn. Our porch is blooming with yellow and burnt orange mums and we've collected enough pumpkins to make even Linus jealous.

What better way to celebrate fall than with these Pumpkin-Orange Spice Muffins with Cinnamon Ginger Streusel. You won't be able to get enough of their yummy pumpkin citrus spice flavor, moist, dense crumbs and crunchy streusel topping. These freeze and reheat well. Enjoy!

Pumpkin-Orange Spice Muffins with Cinnamon Ginger Streusel
Makes 2 dozen
(Adapted from Gourmet, Nov 2006 issue)

3 cups flour
2 tsp baking powder
1 tsp baking soda
1 tsp salt
2 cups canned pumpkin puree
1/3 cup oil
1/3 cup applesauce
4 large eggs
3/4 cup white sugar*
3/4 cup brown sugar*
2 tsp dried orange peel
1 tsp cinnamon
1/4 tsp nutmeg
1/2 tsp ginger
1/4 tsp cloves

Cinnamon Ginger Streusel Topping:
4 Tb flour
2 1/2 Tb brown sugar
1 tsp cinnamon
1 Tb butter
1/4 tsp ginger

Preheat oven to 350'
1.) Mix together the dry ingredients in a bowl (flour through salt).
2.) Mix together the wet ingredients and spices in a separate bowl (pumpkin through spices).
3.) With a fork or your fingers combine the streusel topping in a small bowl and set aside.
4.) Add the dry ingredients to the wet ingredients in batches, using a large spatula to combine, careful not to  over mix.
5.) Scoop out pumpkin batter into 24 paper-lined muffin tins.
6.) Spoon streusel evenly on each and press topping into batter.
7.) Bake for 18-20 minutes. Let cool slightly before serving.

*The original recipe called for two full cups of sugar. I added the streusel topping and substituted applesauce for some of the oil. I thought this would make up for some of the sweetness so I reduced the sugar to 3/4 cup each. I missed the full sweetness of the muffin though. Next time I'd add the full two cups of sugar but I leave it up to you.

Tuesday, October 25, 2011

Datenight Dinner at Home

Sometimes, as much as you'd like to, it's just too much work to go out on a date with your spouse. You have to find a babysitter. Wash your hair. Apply makeup. Drive somewhere. I know, it's just exhausting.

Seriously though, before kids my husband and I used to cook together every Friday night after a long week at work, rent a movie and stay in. So when shiitake mushrooms came in The Produce Box this week, ribeyes went on sale at Harris Teeter, and my husband got a craving for stuffed figs all at the same time we decided to resurrect an old tradition. We fed the kids pasta, put on a movie for them and met in the kitchen.

Now my husband swears he can't cook but look at these Baked Stuffed Figs with Prosciutto, Goat Cheese, Rosemary and Honey before they went into the oven. He bought all the ingredients from our local Harris Teeter (minus the rosemary which came from our garden) and found the recipe at the TasteFood blog.
Meanwhile, I was in charge of grilling the ribeyes and getting the mushrooms tipsy. Don't worry, they didn't complain although the ribeyes did sizzle. In my humble opinion ribeyes need very little prep other than a dry massage with course sea salt and ground pepper and the kiss of a high-heat grill just long enough to keep them from mooing. Mushrooms, however, need more persuasion.

Take three tablespoons of butter and and melt it in a pan with a few cloves of minced garlic and a little olive oil. Warm the garlic until your house smells like you've died and gone to Italian heaven.
Add the mushrooms and cook until tender, ten minutes. Add in the wine. In this case I had a half pound of mushrooms and used 1/2 cup of wine. Simmer in the wine sauce for another five to ten minutes.
The wine and butter sauce will thicken and reduce and soak into the mushrooms until it looks more like this when it's finished.
 Spoon the mushrooms over the ribeyes, saving the larger portion for your spouse. Now, that's love.
The steak and mushrooms in red wine sauce were a nice contrast to the baked stuffed figs, which turned out jammy and lush and perfectly infused with rosemary flavor. What's sexier than cooking and then eating a meal together, except a glass of wine and a bar of dark chocolate for dessert while your husband does dishes?

Now for the less romantic details. The ribeye was on sale for $6 and I butterflied it to make two steaks. The mushrooms were $5.50. The figs ran $.79 each and the goat cheese cost $5.99. Add in a $10 bottle of wine and you get a sumptuous dinner for two for around $30. And we didn't even have to pay a babysitter or argue over how much to tip the server.

Monday, October 24, 2011

Feeding Four featured on Strictly Homemade blog today

My good friend Maridith featured some of my recipes on her fabulous blog Strictly Homemade today. Check it out.

Saturday, October 15, 2011

Tangy Fall Apple Salad

Mom used to make this salad growing up. It's a great way to take advantage of the gorgeous fall apples out right now. Serve as is or toss with chopped iceberg lettuce or baby spinach. Add in baby marshmallows or substitute dried cranberries or yellow raisins for the regular raisins. Dad says my great grandmother used to add chopped bananas. For more color, leave some of the skin on the apples.

Tangy Fall Apple Salad
3 large apples (mix of crisp/sour and sweet like Granny Smith and Concord), cored, peeled and chopped
4 small boxes raisins
1/4 chopped pecans
1 celery stalk, chopped small
1/3 cup mayonnaise
1 Tb apple cider vinegar
3 Tb sugar (adjust according to your apples and taste)
pinch fresh ground black pepper
Optional: baby marshmallows and iceberg lettuce or baby spinach

1.) Toss apples, raisins, pecans and celery in a medium bowl.
2.) Whisk mayonnaise, vinegar, sugar and pepper in a small bowl.
3.) Pour dressing over apple mix and toss well to combine.

Wednesday, October 12, 2011

Score FREE spices and teacher gift at Penzey's Spices--$14+ value

Stop in at your Penzeys Spices store right now and get a free 1/2 cup jar of Forward spices, normally $5.39. Use it to add flavor to meat, veggies, rice or pasta. No purchase necessary. There's a coupon in this month's catalog to get the Forward free but I couldn't find mine. The folks that work at Penzey's are usually very helpful and friendly, so ask and you might receive. I did! Or if you're shopping online use the coupon code 15958C at checkout.

You can also score a FREE teacher's gift set with any purchase, normally valued at $8.78. If you don't have a Penzeys in your area you can also score this deal with any online purchase using the coupon code 83018c at checkout. Of course you'll have to pay S&H, $3.95 for a minimum order. You can use both coupons at checkout online with a minimum purchase. (Order an empty glass spice jar for as little as $1.39.)

Thanks to retailmenot.com and hip2save.com for the coupon codes.

Tuesday, September 20, 2011

Spicy Sweet Potato Sausage Hash

School's in session, and after carpool, the after-school snack, and homework I'm all about the one-dish dinner. It's healthier and faster than a casserole, which usually has some kind of cheesy sauce and needs to bake. And with dishes like this I don't feel bad skipping the salad. Cilantro counts as a leafy green, right?

Spicy Sweet Potato Sausage Hash
1 sweet potato, peeled, chopped
1 lb turkey sausage
2 tsp cumin
1/4 tsp cayenne pepper
1/2 tsp cinnamon
2 Tb apple cider vinegar
2 Tb brown sugar
15.25 oz black beans, rinsed and drained
1/2 cup chopped cilantro
salt & pepper to taste


1.) Boil the potato until soft, about 10 minutes. Drain and set aside.
2.) In a separate pan (this dish all comes together in one pan but you dirty two dishes to make it this way), fry the sausage until mostly done. Add the spices and cook for five minutes.
3.) Toss the vinegar in the pan and stir, scraping up the dark bits on the bottom of the pan. Add the brown sugar and toss in the black beans. Add in the sweet potato and cook just until it's all heated through. Toss in the chopped cilantro. Salt and pepper to taste.
4.) There's so much you can do with this hash. Eat it as is or scoop it into a flour tortilla and drizzle on some heated enchilada sauce from a can. Or take the same enchilada sauce and pour enough on the hash to make it moist and serve it on rolls like a sloppy joe. If you have little ones who won't eat food that's touching anything but air you can serve the separate portions like the picture below. The possibilities are...well, there's a bunch.


Enchilada style

Friday, September 16, 2011

Make your own homemade bread in a Dutch oven

I recently picked up Ratio: The Simple Codes Behind the Craft of Everyday Cooking by Michael Ruhlman. I was intrigued by the author's promise to become unchained from recipes. I imagined myself freely inventing in the kitchen with a few basic figures and techniques to light my way. Bye-bye cookbook collection! Well, of course, it didn't really work out that way. Turns out you can't exchange years of schooling and real-life experience for a $16 book. Shucks. But I will say that Ratio  is full of essential information, techniques and tips that have started to change the way I cook.
For starters, I now own a digital scale so I can measure ingredients by weight (ounces) instead of volume (cups) if a recipe calls for it. (I'm so proud of myself). And I overcame my fear of yeast. Those little buggers have broken my heart time and again. Hours of rising and punching down and kneading and all that lovely flour gone to waste. It's enough to make a girl curse...the yeast, of course. The Ratio recipe was not fool-proof, because, well, I was cooking. The dough came out very sticky and gooey in my KitchenAid mixer with the dough hook.
 I fought back tears, covered it in Saran Wrap and tossed the whole lot in the fridge. I might have eaten a few of those Fudgey Cheerios bars in the background for consolation. Two days later and the cold, dry atmosphere of the fridge had apparently whipped the dough into submission. I was able to shape the dough into a boule or round loaf.
I let it rise again in an oiled Dutch Oven, cut an "x" into the top and sprinkled it with fresh rosemary and sea salt. Okay, actually, I cut it and sprinkled it with rosemary and then let it rise. Next time I'll follow Ruhlman's instructions and wait until the dough rises first so my "x" doesn't get so spread out. And I'll work the rosemary into the actual dough and give it an egg wash for shine before sprinkling it with the sea salt. I did follow his instruction to place the Dutch oven's lid on for the first 30 minutes and then take the lid off for the remaining time.
 When my thermometer read between 180'-210' (another great tip from the book) I took it out of the oven. Ta-da! Gorgeous. Delicious. A crispy exterior and chewy interior and it only took me two days to get there. No wonder we just buy this stuff in the store now. 
I'm sure with more practice I'll get better at this. I mean, you can't put a price on homemade bread fresh out of the oven, can you? Okay, maybe you can, but it's the principle of the thing. I can't wait to try a couple of his bread dough variations, like chocolate cherry bread and grilled focaccia. When I get a hang of bread dough, I'll move on to pasta dough. That's kind of the way this book works, moving from one passion or obsession to another. You learn as much as you can about one recipe--sorry, ratio--and move on to the next. I'm still going to need this book as a crutch for a while, but maybe one day I'll be able to set it aside.

Update 9/14/11: I have since made this bread again and got it in the oven in a single afternoon, in time for a late dinner. Hurrah! The dough was a great consistency, not at all sloppy and wet like the first time.
I'm not sure what I did wrong the first time but I think it probably had to do with too much water. This time I incorporated the rosemary into the loaf instead of sprinkling it on top and let the dough rise before cutting the x in the top and adding the oil and salt. It worked great. Good recipe and I'll be making it over and over.
Related Posts Plugin for WordPress, Blogger...