Showing posts with label entree. Show all posts

Thursday, March 8, 2012

Crockpot Cranberry Portabella Mushroom Meatballs over Cheesy Smashed Red Potatoes

This is a comfort food coma-in-a-crock-pot kind of meal but with way fewer calories, sodium and fat. Meatballs in a velvety mushroom-cranberry sauce with tender portabella mushrooms, served in a nest of cheesy smashed red potatoes.Yum. You've noticed that I've been creating a lot of crockpot meals lately? No, this isn't becoming a crockpot recipe blog. I'm just re-discovering ways to cut down my cooking time (like using my crock pot, my bread machine, and freezer meals) while still making healthy, inexpensive, satisfying meals for my family. And, of course, passing on my re-discoveries to all of you.

All you need for your meatballs
Crockpot Cranberry Portabella Mushroom Meatballs
14 oz canned cranberry sauce
14 oz low-fat and low-sodium cream of mushroom soup
28 oz package frozen turkey meatballs
1/3 cup craisins
8 oz sliced mushrooms like portabella
1/2 cup finely diced yellow onion

1.) In a saucepan heat the cranberry jelly until it starts to look more liquid. Add the soup and stir together.
2.) Place all of the other ingredients in a crockpot. Pour the cranberry sauce over top.
3.) Cook the meatballs on low for 5 or 6 hours until the onions are tender.

Cheesy Smashed Red Potatoes
5 medium red potatoes washed and quartered, skin still on
3 Tb light butter spread
1/2 of an 8-oz container of reduced fat sour cream
1/2 cup shredded reduced fat sharp cheddar cheese like Cabot's
salt and pepper to taste

1.) Boil the potatoes until tender. Drain.
2.) Smash the potatoes with a potato masher or fork leaving large chunks.
3.) Add spread, sour cream, cheese and season with salt and pepper to taste. Continue to mash together until combined. I like to leave big, tender lumps of potato.

Putting it all together...
Scoop out a serving of mashed potatoes and use a large spoon to press down the center into a "bowl" shape. Spoon meatballs and sauce over top. Serve with steamed corn or other veggie or salad. Enjoy!

Wednesday, February 22, 2012

Crockpot Italian Chicken (and leftover ideas)

italiancrockpot
I love easy. I love healthy. I also love anything using Italian dressing because my boys will gobble it up. Make your own dressing for this recipe with either the dried Good Seasonings packets from the salad dressing aisle of any store or the Penzey’s Italian dressing mix. That way you can reduce the amount and control the type of oil you use. A prepared light dressing might work too. Just make sure it’s not too sweet since they usually add sugar to enhance the flavor.

Serve Crockpot Italian chicken hot over a bed of brown rice (your freezer rice perhaps?) and with a few veggie sides for a complete meal. Leftovers freeze and reheat well. Just add a little more Italian dressing if the chicken gets too dry. You can also use the leftovers to make a Ranch Chicken Flatbread. Spoon the meat onto warmed flatbreads and top with chopped fresh tomatoes (or prepared tomato bruschetta from the store), lettuce and ranch dressing.

Crockpot Italian Chicken
6 boneless chicken breasts
1 standard-sized bottle of Italian dressing (see note above)

1.) Place the chicken in the bottom of a medium crockpot. Pour the dressing on top.
2.) Cook the chicken on low for around 5 hours.
3.) Turn the crockpot off when the chicken starts to fall apart and let the meat absorb the leftover juices.
4.) Serve over brown rice and with a veggie. Even my boys love this stuff.

Tuesday, September 20, 2011

Spicy Sweet Potato Sausage Hash

School's in session, and after carpool, the after-school snack, and homework I'm all about the one-dish dinner. It's healthier and faster than a casserole, which usually has some kind of cheesy sauce and needs to bake. And with dishes like this I don't feel bad skipping the salad. Cilantro counts as a leafy green, right?

Spicy Sweet Potato Sausage Hash
1 sweet potato, peeled, chopped
1 lb turkey sausage
2 tsp cumin
1/4 tsp cayenne pepper
1/2 tsp cinnamon
2 Tb apple cider vinegar
2 Tb brown sugar
15.25 oz black beans, rinsed and drained
1/2 cup chopped cilantro
salt & pepper to taste


1.) Boil the potato until soft, about 10 minutes. Drain and set aside.
2.) In a separate pan (this dish all comes together in one pan but you dirty two dishes to make it this way), fry the sausage until mostly done. Add the spices and cook for five minutes.
3.) Toss the vinegar in the pan and stir, scraping up the dark bits on the bottom of the pan. Add the brown sugar and toss in the black beans. Add in the sweet potato and cook just until it's all heated through. Toss in the chopped cilantro. Salt and pepper to taste.
4.) There's so much you can do with this hash. Eat it as is or scoop it into a flour tortilla and drizzle on some heated enchilada sauce from a can. Or take the same enchilada sauce and pour enough on the hash to make it moist and serve it on rolls like a sloppy joe. If you have little ones who won't eat food that's touching anything but air you can serve the separate portions like the picture below. The possibilities are...well, there's a bunch.


Enchilada style

Wednesday, September 7, 2011

One-dish Kielbasa Dinner


Some things go hand-in-hand, like peanut butter and chocolate or kids and dirt. Magic happens when you mix potatoes, onions and peppers with smoky, grilled turkey kielbasa. The real magic though is when your family eats it. All. Gone. If you don't have or like kielbasa, use Italian or other link or even crumbled sausage (of course frying up crumbled sausage would make this a two-dish dinner, but it is yummy), or even good quality hotdogs if you're really desperate to get your kids to eat a protein. I never know what's going to get my pickiest eater to try something. Comparing the kielbasa to a hotdog was enough to get him to clean his plate. Then he smiled and said, "This tastes just like sausage. I love sausage." Just smile and nod, Mom.

One-dish Kielbasa Dinner

1 package (two links) smoked, turkey kielbasa
2 yukon gold potatoes
1/2 large red bell pepper
1/2 large green bell pepper
1/2 cup sliced yellow onion
1 Tb olive oil
2 Tb balsamic vinegar
salt, pepper
herbs to taste

1.) Grill the kielbasa (or pan fry it if you want) until heated through. Half the kielbasa links and then slice each half in 2-inch long pieces. Set aside.
2.) Wash your veggies and slice them--the peppers and onions in long strips and the potato in thin, 1-inch pieces, skin on. You can play with the veggies here. Try squash, zucchini or sweet potatoes.
3.) Heat the olive oil in a pan on medium-high heat. If you've pan-fried your kielbasa, just use the same pan.
4.) Saute your veggies until tender. I add a splash of water to the pan and put the lid on to steam them and help the potatoes soften up faster. Just a couple of Tbs of water will do the trick.
5.) When the veggies are tender, slide the kielbasa into the pan. Add your balsamic vinegar, salt, pepper and herbs. I used one spear each of fresh lavender and rosemary, chopped. If you don't have fresh herbs on hand then 1 Tb dried Italian herbs (oregano, basil, rosemary mix) will do the trick. Serve with warm, buttered rolls for a satisfying, homey meal.

Wednesday, August 17, 2011

Grilled White Eggplant with Pesto

Eggplant is one of those foods, like okra, that has to be cooked just right to be enjoyed. Depending on how it's prepared it can be, in my mind, bitter or slimy. My husband has always hated eggplant until I made it this way. I used the basil pesto I made earlier in the summer but you can find pesto in your own produce section or with the spaghetti sauces. (And you don't need 6-8 cups of basil to make pesto on your own. Just follow the ingredients list and adjust amounts based on how much basil you can get your hands on.)

Here's what a white eggplant looks like, in case you've never seen one. They were new to me. They remind me of fat little ghosts, but that could be because my oldest boy is playing a lot of Super Mario right now.
I paired the eggplant with a Veggie Flatbread (although I actually used garlic naan for the variation below) for dinner and made use of all of the peppers and squash we have on hand right now. So tasty you forget it's all good for you. What did the kids think? Well, they still wouldn't touch the eggplant but my hubby gobbled it up.

Grilled White Eggplant with Pesto

1 large white eggplant (purple is fine too)
olive oil
salt
1/4 cup pesto, fresh is best

1.) Quarter the eggplant and slice the quarters into 1/2-inch thick slices. Salt and lay out on paper towels for at least an hour. Rinse and pat dry.
2.) Toss lightly in olive oil and grill on medium heat until soft and grilled nicely.
3.) Drizzle with pesto and serve hot.

Thursday, April 21, 2011

Grilled Lemon Garlic Herb Chicken Breasts


My oldest son is out of preschool all week for Easter break, so we're doing one special, fun thing each day. Tuesday night we decided to give our first camp-out in the backyard a try. I grew up camping, but I have since discovered the wonder of hotels. My idea of 'camping' now involves a 30-foot long Winnebago with hot water and a stove to cook on. But with two boys and a husband who's a former Boy Scout I'm outnumbered. Don't get me wrong; I'm not a super girly-girl. I love outdoor adventures. But I also like sleep and a hot shower after a full day of sweating and a meal I don't have to scrape from the cast iron skillet in the stream afterward. And I usually end up with a rash or allergic reaction to something. Okay, I may be a little bit of a wimp.

Knowing all this, and being skeptical that our kids would make it the whole night in the tent, we decided to try camping within reach of home first. Tuesday night we set up the tent, found our four camp chairs, built a fire worthy of a former Boy Scout, assembled the s'mores fixin's and slathered on the bug spray. If you're thinking, "That's a lot of work for a weeknight," why yes, you would be right. Which is why I made dinner super easy that night with this grilled Lemon Garlic Herb Chicken marinade. Marinate your chicken for an hour or so, throw it on the grill and serve it with a fresh salad and some rice or pasta. (I had leftover Mrs. T's feta and spinach perogies in the freezer I baked as a side.)

How did our camp-out go? Let me paint you a picture. The birds were chirping. The wind was blowing. The stars glowed brightly overhead. My sinuses were swelling from the pollen despite both Nasonex and Claritin. Minutia! (Gesundheit.) We had eaten our fill of s'mores, and I was snuggled into the tent with the boys while Rich watched the fire. Can you smell the wood smoke? Yeah. And here's what it sounded like to our neighbors:

Baby: Daddy?! Daddy?!
Daddy: Yes, Baby?
Baby: No night-nights, Daddy.
Daddy: Go night night Baby.
Baby: (Pauses as if considering this perfectly reasonable request.) No.
Oldest: My stomach hurts.
Mommy: You probably ate too many s'mores.
Oldest: But I only had five!
Mommy: Maybe five was too many.
Oldest: Oh.
Mommy: Go to sleep, Honey.
Oldest: I don't feel safe in a tent. I think we should move it. We're going to slide down the hill.
Mommy: We're not anywhere near the hill. Go to sleep.
Oldest: I think I want to sleep in my bed.
Baby: Daddy?!
Daddy: Yes Baby.
Baby: No night-nights!

There might have been the teensiest bit of sighing through this exchange on my part. By 9:30 p.m. both boys were tucked safely in their beds. They were asleep by 9:35 p.m. Mom and Dad followed suit by 10:30 p.m. The next morning my oldest said he missed camping out and wanted to try again. My husband and I talked about taking the kids to the mountains where we can wear them out hiking and swimming first, then try camping. But really I'm thinking there's a Winnebago somewhere with my name on it.


Lemon Garlic Herb Marinade
4 boneless chicken breasts
juice of one lemon
2-3 small cloves of garlic, chopped
Tbs fresh chopped oregano
Tbs fresh chopped rosemary
pinch of salt
pinch of black pepper
1/4 cup olive oil
1.) Squeeze the lemon juice into a small bowl. Add chopped garlic and herbs, salt and pepper. Whisk in olive oil.
2.) Place thawed chicken breasts in a shallow bowl. Add marinade and toss to coat.
3.) Marinate an hour or more, turning once.
4.) Grill until done.
5.) Top with some crumbled feta cheese and capers or chopped olives if desired. I garnished mine with rosemary.

Monday, March 21, 2011

Tortelloni in Lemon Cream Sauce with Spring Vegetables--$1 off coupon

Pre-made tortelloni or ravioli are a huge hit at our house. We usually eat them one of two ways--in red sauce or with olive oil, salt and pepper, and Parmesan. Boring after a while, and not so diverse on the dietary scale. So here's a little something to liven them up and get lots of yummy veg while still being quick and easy. I substituted half and half for heavy cream to cut out hundreds of calories and a load of fat. If you can find whole wheat or low-fat tortelloni, all the better. This might be one of our new favorite meals! And if it's Buitoni that you like, here's a way to get a $1 coupon on your next purchase.
Tortelloni in Lemon Cream Sauce with Spring Vegetables

20 oz package pre-made tortelloni, cooked according to instructions
3 cups chopped veg, such as carrots (thinly sliced), yellow squash, zucchini, asparagus, peas and bell peppers
3 cloves garlic, minced
1 Tb olive oil

Sauce:
1 cup half-and-half
1 Tb butter
1 lemon (zest and 3 Tbs juice)
pinch of salt and pepper to taste

1.) Saute vegetables and garlic in olive oil or add a splash of water and place the lid on the pan to steam the veg just until tender.
2.) Meanwhile in a separate sauce pan, heat butter and half-and-half until butter is melted. Cook 10 minutes or until cream thickens slightly. Stir in lemon juice and zest. Add salt and pepper to taste. Let cool slightly.
3.) Cook tortelloni according to package instructions and drain.
4.) In a large serving bowl, gently combine the tortelloni and vegetables with the sauce. Stir to coat.
5.) Serve with Parmesan cheese and any fresh herbs if you have them on hand.

Monday, March 14, 2011

Pasta with Spinach, Beans and Cheese

Recipe from the Complete Cooking Light Cookbook, 2000.

Pasta with Spinach, Beans and Cheese
 8 cups of chopped spinach leaves
6 oz. spiral-shaped pasta
2 Tb olive oil
1/4 tsp salt
1/4 tsp pepper
19-oz can of white beans, such as Navy or cannellini, rinsed and drained
2 minced garlic cloves
1/2 cup shredded cheese such as Parmesan or Asiago
  1. Drain and rinse beans in a strainer.
  2. Boil pasta until al dente. Drain in the strainer with the beans to warm up the beans.
  3. Toss all ingredients in a bowl while pasta is still hot and spinach wilts slightly.
  4. Top with extra cheese if desired and serve warm. Also great as a cold salad the next day.

Wednesday, March 9, 2011

Pasta Margherita

Pasta Margherita, inspired by the pizza of the same name, is an easy way to take ordinary pantry items and liven them up with fresh herbs and cheese. If your family isn't big on large chunks of tomato, you can also puree the sauce before tossing it with the spaghetti. I used shaved Parmesan on this meal but it's also good with the grated kind, in the green canister. Enjoy--the dinner and your free time, because this whips up in a snap!

Pasta Margherita
2 cans diced tomatoes (with Italian seasonings if available)
pinch red pepper flakes
3 cloves garlic, minced
fresh basil
olive oil, salt, pepper
1 box spaghetti
grated Parmesan cheese

1.) In a sauce pan, combine diced tomatoes, minced garlic, red pepper flakes, and oil, salt and pepper to taste. Cook on low until heated through.
2.) Meanwhile, boil pasta until al dente. Drain.
3.) Add the pasta to the sauce and toss. I use tongs for this and add the pasta a little at a time to the sauce. Err on the side of having it too saucy. The pasta will soak up some of the liquid and you don't want it too dry.
4.) Chop basil and toss with pasta.
5.) Serve with grated Parmesan.

Monday, February 28, 2011

Thai Peanut Chicken Spring Rolls


In honor of the recent wave of beautiful, warm weather here in North Carolina, I optimistically present a recipe for spring rolls. I've used these wrappers all of two times now and will admit that they are a bit...homely. I'm sure there's a better way to roll these than I've shown here. But I love the combination of the fresh vegetables, savory chicken and salty peanuts, and it's always fun to eat an Asian meal wrapped up like a Mexican burrito. I serve everything chilled or at room temperature. And for the little ones, I set aside the vegetables, chicken and pasta separately. Same meal Mom and Dad eat, just served differently.


FREEZER TIPS: As long as you're going to the trouble to make these, double this recipe and put aside a second meal in the freezer for another week. Place half of the marinated chicken--uncooked or cooked--in a quart-sized freezer bag. Place 1/2 the pasta in a separate freezer bag. Staple the two bags together and place them in the freezer. The spring roll wrappers will keep in the pantry indefinitely. My Mom brought me these wrappers last Easter and I've just now worked up the nerve to use them. Thanks Mom for the inspiration!

Thai Peanut Chicken Spring Rolls
Makes 4 large rolls

Pasta sauce/chicken marinade:
  • 1 Tb brown sugar
  • 2 Tb smooth peanut butter
  • 1 tsp red pepper flakes
  • 2 cloves garlic, minced
  • 1 Tb grated fresh ginger
  • 1/4 cup soy sauce
  • 1/4 cup rice vinegar
  • Juice of 1/2 a lime
Remaining ingredients:
  • 1/2 box spaghetti noodles, cooked (I like the "Plus" pastas for fiber and protein. Soba are great if you have them on hand.)
  • sesame seeds
  • sliced green onions
  • 2 chicken breasts, cut into strips
  • 4 spring roll wrappers, soaked in water until softened
  • 1/2 red pepper, cut in thin strips
  • 1/2 cup shredded carrots
  • 1 cup chopped Bibb lettuce
  • 1/2 cup chopped, salted peanuts
  • soy sauce
1.) Blend together all the marinade/sauce ingredients with a whisk.
2.) Add 1/4 cup of peanut sauce to the cooked noodles along with some sesame seeds and sliced green onions. Stir with tongs to combine. Set aside.
3.) Add remaining 1/4 cup of peanut sauce to chicken and coat. Set aside to marinate 1 hour, turning halfway through. Grill chicken and cut into smaller strips if needed.
4.) Pour warm tap water into a 9"x13" pan. Place the spring roll wrappers one at a time in the pan, completely submerging them. Let stand until softened, about 30 seconds.
5.) Gently lift one spring roll from the water and drape across a dinner plate. Arrange chicken, peppers and carrots in the center of the wrap, then top with lettuce, peanuts and noodles. Season with soy sauce to taste.
6.) Close wrap by pulling two opposite sides together, overlapping to seal. Repeat with the remaining two sides. Flip and serve.

Saturday, February 19, 2011

Easy Bread Pan Lasagna

Easy Bread Pan Lasagna is my solution to my love-hate relationship with this dish.  

To Love: The way lasagna smells when baking in the oven. The crispy outside pieces. The frilly edges of the noodles. The special-occasion-ness of it.

To Hate: Pre-boiling and then working with those darn noodles. I always boil too many or, worse, not enough. Just as bad are those anemic, expensive, no-boil noodles without the frilly edges. And having to bake an entire 9"x13" pan is overkill for our small family.

Then I tried this method of adding water to the sauce and heating it first. Voila! Wait, what's the Italian equivalent for that? Oh well. No more messy pre-boiling the noodles. And instead of one giant 9"x13" pan of lasagna (which you can still do if that works better for your family) I split the ingredients between three bread pans--more crispy, yummy edges, more flexibility. I can bake one pan for my family and have two in the freezer for later in the month. Or, if we have guests, I can bake all three. So if you're feeling inspired to make marinara from my last post, here's an idea for how to use your sauce this week.
Easy Bread Pan Lasagnas
Makes 3 

2 lbs ricotta
1/4 cup parmesan
1 tsp salt
1/2 tsp pepper
2 tsps basil
1 egg
1 jar spaghetti sauce
1 cup water
2 cups shredded mozzarella
1 lb of lasagna noodles, uncooked

Preheat the oven to 350'.
1.) Mix ricotta through egg in a bowl
2.) Pour sauce in a pan; add one cup water; heat on low.
3.) Grease three lasagna pans, bottom and sides.
4.) Pour 1/2 cup hot sauce in bottom of each pan.
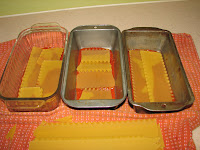
 5.) Add one layer of uncooked lasagna noodles, breaking the noodles to fit the pan and overlapping them.
6.) Dollop four spoonfuls of ricotta mix over top of dry noodles. Spread evenly.
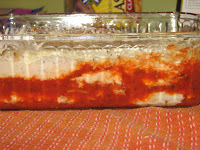
7.) Repeat Steps 4, 5 and 6 twice more, ending with dry noodles.
8.) On top of the third layer of noodles, split the remaining ricotta cheese mix across the three pans and spread evenly.
 9.) Tap the pans on the counter to eliminate air bubbles and to make sure the dried noodles are fully saturated in the sauce. Shake the pan left to right, top to bottom.
10.) Split the 2 cup bag of shredded mozzarella between the three pans. Sprinkle with parmesan, basil, salt and pepper.
11.) Bake (over a cookie sheet to catch any troublesome spillage) for 35-40 mins or until the top is bubbly and a knife pierces through without resistance from the noodles.*

*If you're freezing these or will reheat them as a whole pan at a later date, undercook the noodles just slightly. Take maybe 5-10 minutes off the bake time. This means that when you pierce the lasagna with the knife you'll feel the knife pass through the noodles. Before freezing, let the lasagnas cool completely, then wrap with Saran Wrap then foil. For added protection, slip each pan into a gallon-sized freezer bag. They should keep around a month. When you reheat them, thaw in the fridge overnight. Cover with greased foil (so you don't lose your cheese topping) when you bake them in the oven at 350' for about 30 mins.

Thursday, January 13, 2011

New Year's Food Resolution: More Veg, Less Meat

One of my New Year's resolutions is to eat less meat and make the meat we do use go farther. I want us to eat healthier; and I want to spend less money on groceries. So this week I spent $10 on bone-in chicken breasts at Lowes Foods ($.97/lb) and in about an hour (not including cook time) turned 12 bone-in breasts into 24 medium boneless chicken breasts, 12 chicken strips, 1 gallon of chicken broth and 4 cups of cooked, shredded chicken. Here's how I did it:

Each bone-in breast will give you one large boneless breast and one chicken strip or two medium breasts and a strip. Start by pulling back the skin. Use your knife to separate any membrane from the meat that you can't loosen with your fingers.

You'll need a sharp, thin knife to knock these out quickly. Turn the breast so the skin is flopped over the left-hand side and the meat is on top. You'll feel a hard, flexible line of cartilage on the right. If the breast isn't already pulled away from the cartilage use your knife to cut it away.  You should be able to see where the breast is now separating from the bone and there's a small, separate strip of meat underneath. Cut away the breast. It will be oblong and tear shaped, thicker at the top and thin at the bottom.


 Now that the breast is gone you'll see a small, long strip of meat separately underneath the breast. Use your knife to gently cut the strip away from the bone/cartilage. Cut away any ligament or bone.
 You should now have one large breast, a strip, and the remaining bone/skin/meat. Using a mallet gently pound the thickest part of the chicken breast to an even thickness. Cut the breast into two pieces and set aside. Cut the skin from the remaining bone and discard the skin; save the bones for making broth.
Place the remaining bones with meat in a 6-quart pot. I use a pot that comes with a built-in strainer. Fill the pot with cold water just so the bones are covered. Add three stalks of celery, washed and snapped into three-inch pieces. Peel a yellow onion,cut it into four chunks and add to the water. Add 4 or 5 Tbs of sea salt and 8 to 10 black peppercorns. Bring the pot to a boil. Reduce heat and simmer another hour. Remove from heat, lifting the straining pot with all the vegetables and meat, leaving only the broth in the pan. Place the broth in the fridge or freezer until you're ready to use it. I skim any of the fat off the top before freezing. Discard the vegetables and using your fingers, pluck any remaining cooked meat from the bone and set aside the meat. Discard the bones.

Cutting back on meat will take some dedication. Stretching $10 of chicken is one part of the process. We'll also need to actually eat less meat and replace it with healthier proteins, fruits, veg, grains etc. My goal is not to deprive us by any means, but to make more conscious decisions about what we're eating and where we're spending our money in 2011. In some future posts I'll update you on how we're doing and share meal recipes that either 1.) stretch a little bit of meat to feed four heartily or 2.) skip the meat altogether. I'll also be posting lots of baking recipes. I love to bake when it's cold like this, and what's life without balance?

Tuesday, November 9, 2010

One last meal for the grill


Fall is here. The leaves are gorgeous and the nights are cool. I'm saying farewell to summer and all those fresh veggies with one last summer-time meal for the grill. We have an extended grilling season here in NC that's defined more by when our propane tank runs out than the weather. So far we're good.

This recipe comes from one of this year's issues of Better Homes & Gardens. I promise lots of fall recipes are on their way. This is baking season and it will be bye-bye veggies and hello baked goods!

Artichoke Flatbread
4 whole wheat flatbreads
2 Tb olive oil
6 cups fresh baby spinach
6 oz. herb goat cheese
14 oz. can artichoke hearts, quartered
1 chopped tomato
sea salt fresh cracked pepper to taste

1.) Brush the flatbreads on both sides with oil. Grill lightly to warm on both sides.
2.) Divide remaining ingredients between each flatbread.
3.) Return to grill for two minutes or until bottoms are browned and toppings are heated through.
4.) Season with salt and pepper.

Friday, September 24, 2010

Freezer Meals: ground hamburger/turkey, split chicken breasts


Uh, yeah, that's not actually what my freezer looks like. But I can dream.

Something happens to me this time of year. I start nesting. No, I'm not pregnant, but it does feel similar. Now that at least the nights are cooler, I am compelled to cook mass quantities of comfort food and stockpile them in the freezer. Not that we're in danger of being snowed in any time soon. Case in point: we had a high of mid-nineties today. Still, nature is telling me it's time to prepare for winter... that and I'm just tired of cooking dinner every night.

So this week I bought $30 worth of meat: a three-pound package of 80/20 ground beef, four pounds of ground turkey and 15 pounds of split chicken breasts ($.86/lb at Food Lion). I started cooking and here's what I came up with:
  • 1 small dish of Taco Bake Pasta
  • 1 large pan of Taco Bake Pasta
  • 2 dozen Italian beef/turkey meatballs
  • 2 small Italian meatloafs
  • 1 quart-sized bag of taco meat w/ black beans for tacos
  • 2 small beef and bean taco braids (along with two ham, cheese and asparagus braids)
  • 1 gallon bag of poached chicken breasts, chopped (to add to future meals and for the boys to eat on nights that they don't like what I make)
  • 1 dozen or so marinated (lemon garlic) and grilled chicken breasts (to eat as-is and to add to salads etc.)
  • 2 dozen breaded and baked chicken fingers
And now we're eating out for the rest of the week. Just kidding. In case you think I spent two days cooking, let me reassure you that it's easy to to cook this amount of meals in the same time it takes to make dinner each night. Well, maybe not easy, but it is doable. I started by browning three pounds of ground beef/turkey mix and adding taco seasoning Monday night. Then I used the taco mix to make the taco bake, which we ate for dinner. Tuesday, we had taco salad for dinner and I made the yeast dough for the beef braids and put it in the fridge for the next day. Wednesday, I used the rest of the taco beef for the beef braids and froze a quart of the leftovers for tacos another week. I also mixed the remaining ground beef/turkey in a bowl with an egg, some parmesan cheese, salt, pepper and Italian seasonings and shaped it into meatballs and meatloaf. Thursday, I tackled the chicken. I used a knife to cut one large breast and one chicken "fingerling" away from the bone. I poached a third of the chicken breasts and put the rest in marinade. We ate two of the marinated chicken breasts for dinner and some of the poached chicken for the kids. Tonight, I'll bread and bake the chicken fingers, and we'll eat some and freeze the rest.

A few tips on freezing food. I try to cook and cool everything first. That way, you can just take it out of the freezer the night before and cook it up or serve it room temperature (like the grilled chicken breasts). Just don't overcook or grill your meat so it's not too dry after being frozen and reheated. Individual items like meatballs are great frozen on a tray and then placed in a freezer bag so they don't stick together. I also try to cook small amounts of a lot of different kinds of food. Even family favorites like lasagna get dull when you have them every week. For something like a beef braid, wrap in foil first, label, then seal in a freezer bag. Defrost your meals in the fridge over a day or two or bake them frozen.

Recipes for the beef and ham and cheddar asparagus braid will follow. Other freezer items I typically tackle this time of year are big batches of my MIL's awesome marinara recipe, lasagna, gnocchi and pumpkin muffins. Stay tuned!

Tuesday, September 14, 2010

Feed a crowd with four chicken breasts


Sometimes dinner is more of a come-and-go event than a sit down occasion. Take last Monday night at our house for example. We normally eat early, around 5 p.m., but I had a vet appointment at 5 p.m. and my MIL came to watch the kids. Rich didn't get home for dinner until late. So I needed something that everyone could customize to their tastes and that would hold up over a couple of hours and still taste good. And I needed a lot of it, since a good friend stopped by at the same time with her boys, who wanted some too (veggies always look better at other people's houses). This chopped salad met all of the above requirements and then some. I served it with a pan of hot rolls and had leftovers for lunch the next day. It was a great way to stretch four chicken breasts to feed a crowd.

The idea and Greek dressing recipe are modified from the Spring 2008 special publication by Fine Cooking magazine called Fresh. If you're actually all sitting down to eat at the same time and everyone likes the dressing, you can toss each item in some dressing and arrange in neat, separated piles on top of a bed of lettuce. Beautiful. Of course, leftovers will be soggy so eat up.

Also, the anchovies in the dressing are awesome. They provide a little umami for your tongue without the fishiness. If you're worried the anchovy will be too strong, start with one or two fillets and freeze the rest for later. And try to keep all of the pieces of veggies about the same size--1/2" cubes--with the exception of the chicken.

Help-Yourself Chopped Greek Chicken Salad

Dressing:
  • 1/2 cup olive oil
  • 1/4 cup fresh lemon juice (about 1 lemon)
  • 1 tsp Dijon mustard
  • 2 mashed anchovy fillets
  • salt and pepper
  • pinch of sugar
Salad:
  • 1 block feta cheese (like Athenos) chopped in cubes
  • handful of Kalamata olives, pitted and cut in half
  • 4 chicken breasts, cut in strips
  • 2 cucumbers, peeled and diced
  • 1 red bell pepper
  • 2 vine ripe tomatoes
  • 1/2 purple onion
  • small handful parsley
  • 1 large clamshell of mixed herb greens
1.) Combine the dressing ingredients in a bowl (I used a measuring cup since I could pour the dressing from it and didn't need anything fancy). Mash the anchovies well and whisk it all together. Let sit to blend flavors while you assemble the salad.
2.) Heat 1 Tb olive oil in a pan and season the chicken breasts, both sides, with salt and pepper. Fry until brown and cooked through. Let cool and slice into strips.
3.) Chop the veggies and cheese in consistent 1/2" pieces. Put each item in its own bowl. Serve.

Thursday, September 2, 2010

Make-do Meal: Fritata


I love a meal that saves me money and a trip to the grocery store for that inevitable missing key ingredient. A fritata does all that, looks fancy and is healthy and super easy too. I'm not even going to post a recipe, because it's all about making do with what you have on hand. For the version pictured above, I used:
  • 1 cup shredded zucchini (leftover from making muffins)
  • 1 red pepper (found in the crisper drawer that wasn't going to make it another day)
  • 2 pieces of deli baby Swiss cheese (on sale that week and purchased for grilled cheese)
  • 1/2 cup shredded ham (leftover from the bone of a ham I baked Sunday)
  • 2 green onions (leftover from a stroganoff recipe)
  • 5 eggs
  • 1/4 cup milk
  • salt & pepper to taste
But the variations are endless:
  • ham, broccoli & Cheddar
  • onion & potato
  • asparagus & feta
  • tomato & goat cheese
  • you get the idea...
If you're adding fresh veggies, saute them first in a little oil. This will draw out any excess moisture and make sure you have tender-crisp and not undercooked, crunchy veggies. Then scramble the eggs in a separate bowl with the milk and pour it over top of the veggies in the hot pan, mixing in any cheese you want to add.

Cooking a fritata: You can cook a fritata two different ways, depending on what kind of pan you want to use.
  • Nonstick pan-- cook on medium, scraping the sides toward the center gently with a plastic spatula. When the egg is fairly set (8-10 minutes) jiggle it until you're sure it's loose from the bottom of the pan. When you're ready, flip the fritata out onto a large plate, so it's raw side down, then slide it back into the pan to finish cooking, another 5-8 minutes. It's ready when you poke a hole in the middle and you don't see runny egg oozing out (make sure you're not looking at melted cheese). I saw this method on Rachel Ray's cooking show and gave it a try for the first time. The presentation is nice and you don't have to heat the oven.
  • Cast iron or Iron-clad--Any kind of pan that's oven proof is great too. You won't get that lovely fritata to slide out on a plate but it will still look great. And hey, one less dish to do. Cook the fritata the 8-10 minutes while you preheat the oven to 400'. When it's fairly well set (read: not too jiggly or watery looking), pop onto a rack set high near the broiler in the oven. Bake until it's puffy and golden brown on top.
If you have kids (like my preschooler) who won't eat everything all mixed together, you can also easily set aside the basic ingredients--scrambled eggs, meat, raw or sauteed veggies--and still have a complete meal. Add a fruit or green salad and you're all set. Luckily, we don't all have to eat like preschoolers. :-) Rich, the baby, and I ate it as is. I was thinking next time it would be good with crusty bread and some fresh tomato bruschetta too. Top it off with a little shaved parm to make it extra fancy.

Friday, August 20, 2010

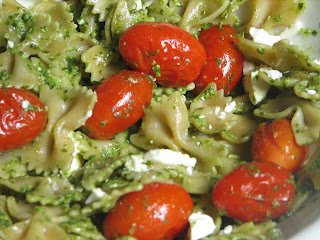
Roasted Tomatoes with Feta and Pesto Farfalle


Phew. Sorry it's taken me so long to get up such a simple recipe. Seems a little anticlimactic. If you had a chance to make pesto or see some in the freshly-prepared section of your grocery store here's a quick, easy dinner or lunch. I wasn't sure how Lincoln, my almost-five-year-old, would take to pesto, but he asks for green pasta for dinner three out of five nights. Which is good since I used up the rest of my basil in the garden this week to make more. This stuff is like gold though with the ingredients--fresh basil, olive oil, fresh grated Parmesan cheese and pignoli aren't the cheapest things in the store. Luckily, the flavors are so intense a little goes a long way. If you have some leftover grilled or rotisserie chicken from a previous meal, that would go great in here too.

Roasted Tomatoes with Feta and Pesto Farfalle
5 cups farfalle, cooked and drained, still hot
5 Tb pesto
1 small package grape tomatoes
feta cheese crumbles
oil, salt, pepper

Wash grape tomatoes and toss in 1 Tb olive oil. Season with salt and pepper. Roast in the oven at 400' for 10 minutes or so, until they split and pop and start to darken. Remove from the oven. Toss the pasta in the pesto lightly to coat. Add the grape tomatoes and toss. Add feta cheese to taste and toss very lightly. Salt and pepper to taste.

Monday, July 19, 2010

Sunday Brunch


Mixed Greens in a Raspberry-Orange Vinaigrette with Blue Cheese, Potato Frittata, and Creamy Lemonade Pie with Fresh Whipped Cream and Raspberries.

This meal reflects the weather we had this weekend: alternately hot and humid, and dark and stormy. The potato strata was a perfect comfort food for a rainy day while the raspberry blue cheese salad and creamy lemonade pie kept it from feeling too heavy with all the heat we've had. For short cuts, use store-bought raspberry dressing, graham cracker crust and whipped cream. But if you have the time and want the full effect, I've included the recipes for each. After all, it's the weekend. I start with the recipe for the pie, since it needs to be made several hours ahead of time. Making the pie the night before is even better.

***
Creamy Lemonade Pie with Fresh Whipped Cream and Raspberries

Crust:
1 1/4 cups graham cracker crumbs
3 Tb sugar
1/3 cup melted butter

Filling:
1-5 oz can of evaporated milk
1-3.4 oz package of instant lemon pudding mix
2-8 oz packages of reduced fat cream cheese (Let sit out at room temp for a while before mixing.)
3/4 cup lemonade concentrate

Topping:
1 cup whipping cream
1 tsp vanilla
1/3 cup powdered sugar

1.) For the crust, mix the ingredients in a bowl then pour into a pie plate, pressing to the bottom and up the sides. Bake 350' for 8 minutes. Set aside to cool.
2.) For the filling, mix evaporated milk and lemon pudding mix, two minutes. Beat in cream cheese until no lumps exist. Slowly add in lemonade concentrate. When the crust is cool, pour the filling into the crust and place in the fridge to set several hours or overnight.
3.) For the topping, chill a bowl and whisk in the freezer until ready. Pour in contents and beat on high until stiff peaks form, about five minutes.
4.) When ready to serve, dollop fresh whipped cream and fresh berries on top of each slice.

***
Potato Fritatta
2 potatoes (Yukon gold are nice for this. I had reds on hand this weekend.)
2 shallots
1/2 cup low fat milk
6 eggs
1/2 cup reduced fat cheddar cheese
salt and pepper
1 Tb olive oil
chives (I had green onion on hand but chives are much better if you have them.)

1.) Thinly slice the potatoes and shallots.
2.) Heat 1 Tb olive oil in a pan and lightly fry the potatoes in batches until tender, not too brown. Fry shallots quickly, 1 min or so, until tender. Set aside warm.
3.) In a bowl, mix eggs, milk, cheese and a dash of salt and pepper.
4.) Add in warm potatoes and shallots and let sit several minutes.
5.) Pour bowl into a new oiled and heated, large cast iron or other oven-proof frying pan.
6.) Cook on stove top until puffed and only jiggly on top.
7.) Place in the oven at 350' for 15 mins or until browned on top, puffed and not jiggly at all.
8.) Top with chopped chives and serve hot.

***
Mixed Greens in Raspberry-Orange Vinaigrette with Blue Cheese

Salad:
1 clamshell package of mixed greens (I love the herb mix.)
roasted, salted sesame seeds
crumbled blue cheese (Chevre is also very good with this. I had blue on hand.)
fresh raspberries

Raspberry- Orange Vinaigrette:
1 Tb raspberry jam
2 Tb fresh lemon juice
1/4 tsp orange juice concentrate
3 Tb olive oil
salt and pepper to taste

1.) To make the vinaigrette, whisk the jam into the lemon juice, adding the orange juice concentrate when smooth. Whisk in the olive oil and flavor with salt and pepper. You won't need a lot of salt if you use salted sunflower seeds.
2.) When ready to serve, toss the greens in a bowl with the vinaigrette until lightly coated. Portion out into four bowls and top with crumbled blue cheese, a sprinkling of sunflower seeds and several fresh raspberries.

Monday, July 12, 2010

Manicotti with Crepes


My original motivation for learning how to make crepes was more savory than sweet. Rich's favorite meal is manicotti, and yes, he loves his mama's best. I've come to terms with the fact that her macaroni and cheese is like heaven, and she's had the corner on manicotti for years. But I think I may have finally developed an upper hand with these crepe manicotti. Now, if I could just master her marinara. ;-) Seriously, my mother-in-law is a great cook, but these are awesome and make enough for three meals for a family of four (assuming one large crepe per person). I include directions for freezing and reheating at the end.

Crepe Manicotti (makes 12 large crepes)
Crepes:
1 cup flour
3 eggs
2 cups milk
1 TB melted butter or canola oil

Filling:
2 lbs ricotta
1/2 cup grated parmesan cheese
1 egg
1 tsp salt
1 TB Italian seasoning
1/4 tsp ground pepper

Sauce and mozzarella topping: 1 jar of sauce will be enough for one dish of four manicotti (I froze the rest). Also, about 1 cup of shredded mozzarella will top it off.

Preheat oven to 350'.
1.) In a blender, mix all crepe ingredients except butter/oil until smooth.
2.) Heat non-stick pan and melt butter or heat oil on medium heat.
3.) Pour out enough of the crepe batter into the pan to fill 2/3 of the pan and then swirl the batter to the outer edges of the pan in a circular motion until the batter sets.
4.) Cook until the crepe starts to pull away from the edges of the pan and curl inward, about 1-2 mins.
5.) Flip the crepe and cook another minute on the other side, then slide off onto a plate.
6.) Repeat, stacking the crepes as you go, until you have around a dozen crepes.
7.) In a separate bowl, combine all of the ingredients for the cheese filling.
8.) Spread 1/3 cup of the cheese filling on the edge of each crepe and roll up.


9.) Place all but four crepes seam-side down on a tray lined with parchment paper and place in freezer for several hours.
10.) Pour enough marinara to cover the bottom of a 9" pan and place the four reserved, large manicotti crepes on top. Top with more marinara and 1 cup of shredded mozzarella cheese.
11.) Cover pan with oiled foil and place in oven. Bake 20 mins until bubbly. Remove foil and bake until browned, another 10 mins. Remove from oven and let cool slightly before serving.
12.) Frozen crepes: When the remaining 9 crepes are frozen, wrap them individually in foil and place in a freezer bag. To reheat later, follow steps 10-11, baking the crepes frozen and adding 10-15 minutes for baking them while covered with foil.


Tuesday, June 29, 2010

Quick, Cheap & Chilled--Gazpacho


Soup is such an easy, weeknight meal that everyone in the family will eat. There's nothing more comforting and homey than soup, salad and bread. But who wants hot soup when we're on our fourth week in a row of 90'-plus weather? Gazpacho is an easy, inexpensive and healthy way to enjoy soup in the summer. I serve it chopped, not pureed smooth, chilled, and with a dollop of sour cream and crunchy bread with butter for dipping. You can pretend it's salsa too, if the kids prefer, and enjoy it with tortilla chips. I served this with grilled chicken pepper kabobs and some of the roasted Eggplant Spread from the previous post.

Chilled Gazpacho with Sour Cream*
3 large tomatoes, seeded
1 cup carrot straws
1/2 red onion
2 TB balsamic vinegar
2 cloves garlic
1-11.5 oz can of V8
salt and pepper to taste
1/3 cup parsley
5-6 basil leaves

Place all ingredients in food processor. Pour V8 over it and pulse until veggies are smooth but still chunky. Chill before serving or serve straight from the food processor with a dollop of sour cream. Hit it with some hot sauce if you like it with heat.

*If you want to save on fat and calories, substitute sour cream for fat-free yogurt.
Related Posts Plugin for WordPress, Blogger...