Monday, February 28, 2011

Thai Peanut Chicken Spring Rolls


In honor of the recent wave of beautiful, warm weather here in North Carolina, I optimistically present a recipe for spring rolls. I've used these wrappers all of two times now and will admit that they are a bit...homely. I'm sure there's a better way to roll these than I've shown here. But I love the combination of the fresh vegetables, savory chicken and salty peanuts, and it's always fun to eat an Asian meal wrapped up like a Mexican burrito. I serve everything chilled or at room temperature. And for the little ones, I set aside the vegetables, chicken and pasta separately. Same meal Mom and Dad eat, just served differently.


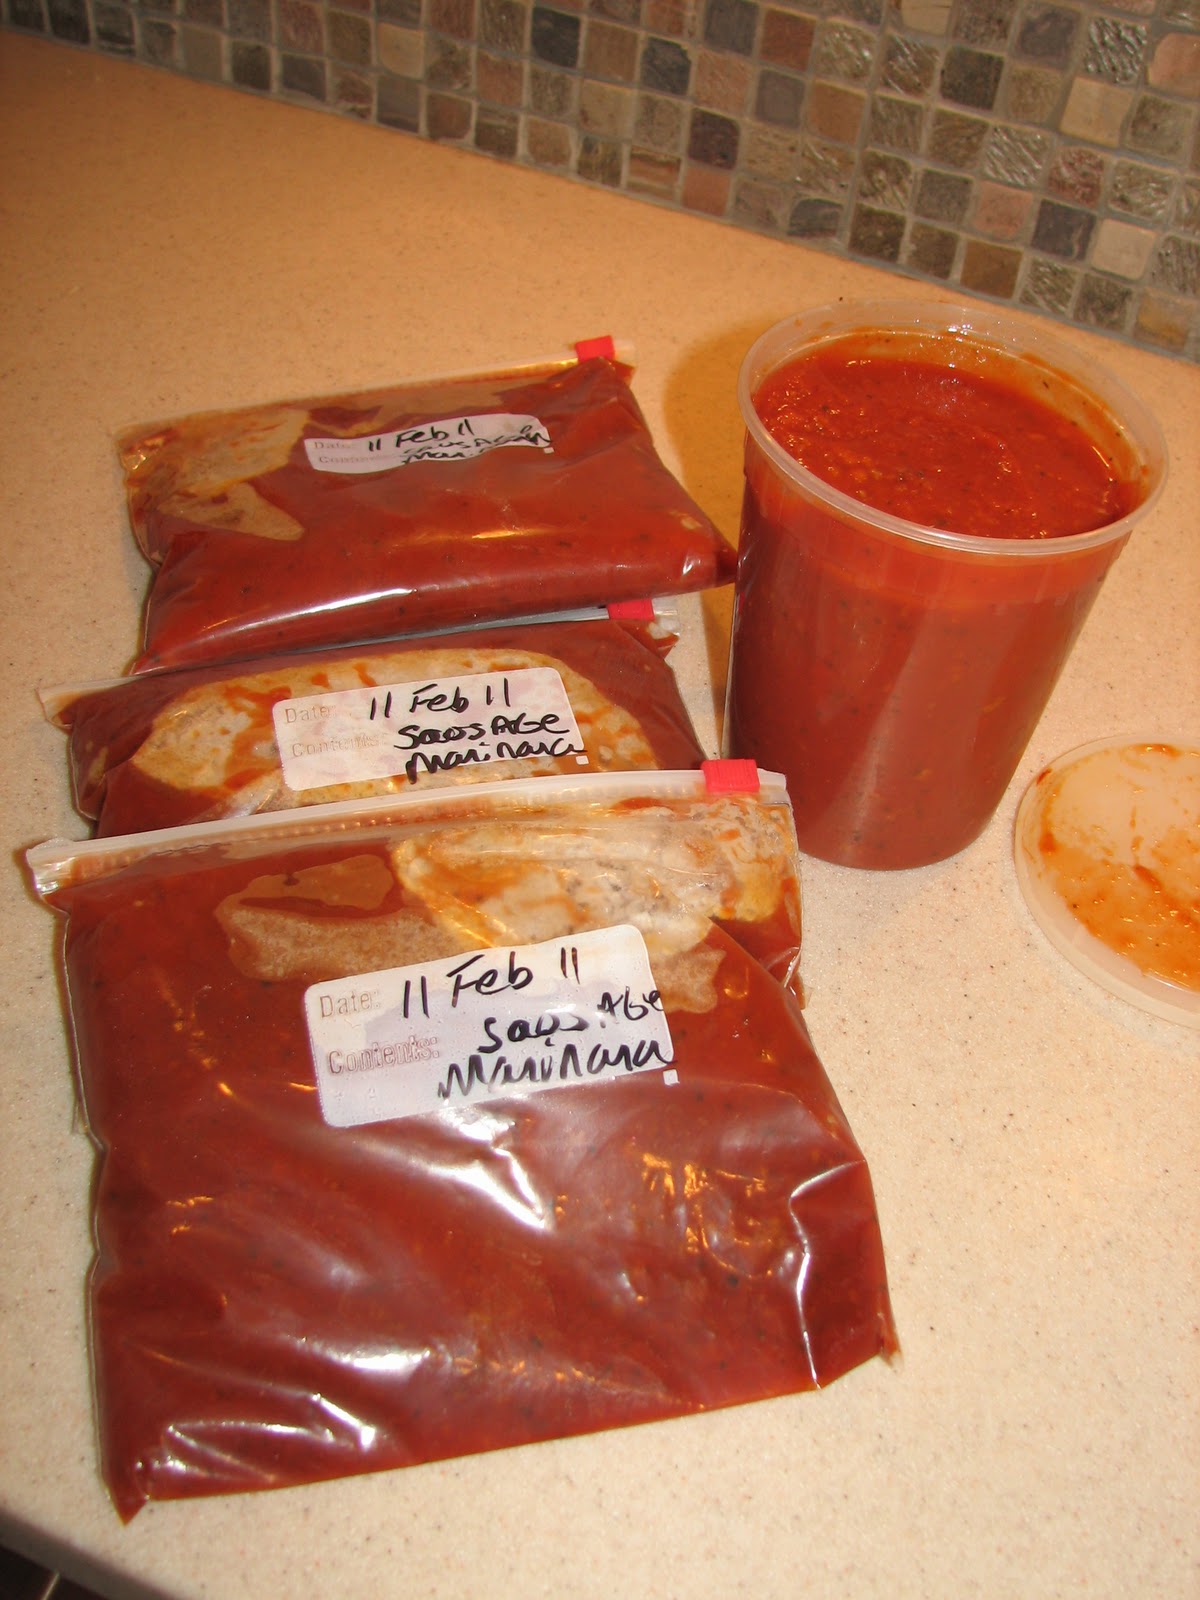
FREEZER TIPS: As long as you're going to the trouble to make these, double this recipe and put aside a second meal in the freezer for another week. Place half of the marinated chicken--uncooked or cooked--in a quart-sized freezer bag. Place 1/2 the pasta in a separate freezer bag. Staple the two bags together and place them in the freezer. The spring roll wrappers will keep in the pantry indefinitely. My Mom brought me these wrappers last Easter and I've just now worked up the nerve to use them. Thanks Mom for the inspiration!

Thai Peanut Chicken Spring Rolls
Makes 4 large rolls

Pasta sauce/chicken marinade:
  • 1 Tb brown sugar
  • 2 Tb smooth peanut butter
  • 1 tsp red pepper flakes
  • 2 cloves garlic, minced
  • 1 Tb grated fresh ginger
  • 1/4 cup soy sauce
  • 1/4 cup rice vinegar
  • Juice of 1/2 a lime
Remaining ingredients:
  • 1/2 box spaghetti noodles, cooked (I like the "Plus" pastas for fiber and protein. Soba are great if you have them on hand.)
  • sesame seeds
  • sliced green onions
  • 2 chicken breasts, cut into strips
  • 4 spring roll wrappers, soaked in water until softened
  • 1/2 red pepper, cut in thin strips
  • 1/2 cup shredded carrots
  • 1 cup chopped Bibb lettuce
  • 1/2 cup chopped, salted peanuts
  • soy sauce
1.) Blend together all the marinade/sauce ingredients with a whisk.
2.) Add 1/4 cup of peanut sauce to the cooked noodles along with some sesame seeds and sliced green onions. Stir with tongs to combine. Set aside.
3.) Add remaining 1/4 cup of peanut sauce to chicken and coat. Set aside to marinate 1 hour, turning halfway through. Grill chicken and cut into smaller strips if needed.
4.) Pour warm tap water into a 9"x13" pan. Place the spring roll wrappers one at a time in the pan, completely submerging them. Let stand until softened, about 30 seconds.
5.) Gently lift one spring roll from the water and drape across a dinner plate. Arrange chicken, peppers and carrots in the center of the wrap, then top with lettuce, peanuts and noodles. Season with soy sauce to taste.
6.) Close wrap by pulling two opposite sides together, overlapping to seal. Repeat with the remaining two sides. Flip and serve.

Tuesday, February 22, 2011

Lemon Spritz Flower and Heart Cookies

Spritz cookies are usually a Christmas tradition, but the cookie presses these days come with heart and daisy disks that beg to be used for spring and Valentine's Day. Linc was my official decorator--for his usual handling fee in chocolate chips and sugar sprinkles. What can I say? Good help this cute is hard to find.
 As a special treat for Lincoln, I mixed up the usual spritz recipe to make it more like his favorite cookies from the grocery store bakery, a lemon spritz. I have to say, they're pretty darn close and don't have any of that nasty mystery ingredient greasiness. Not that these are health food by any means, with not one, not two, but THREE sticks of butter. Ah well. They're tiny. I'm sure five or six won't hurt. Much.

If you don't have any idea what I'm talking about when I say 'cookie press', here's a photo of one from Wilton for about $10. The model I have is very similar. Two tips to making this press and recipe work--don't grease the cookie sheets and don't chill the cookie dough until after they're pressed out onto the cookie sheets and decorated. Then stick them in the freezer for five minutes while you wait for the previous pan to bake. Freezing the dough once pressed will keep the cookies from puffing up and losing their shape. Also, don't re-use a baking sheet until it's cooled, cleaned with soap and water and dried. That way, the cookie dough will stick to the pan and release neatly. If you find your cookies are sticking to the disks, take a second to run hot water over the disk to get rid of any dough buildup, while it's attached to the press. You should get a nice, clean cookie on the next take. Don't worry, this will all make a lot more sense when you're actually using the press. :-) You can also try the chocolate version of this dough that's on the box (dipped in chocolate would be divine) or use food coloring to color the dough. Other cookie disks in my set include a pumpkin, Shamrock and Christmas shapes.

A cookie press might look or sound complicated, but once you get the hang of it you'll be hooked. How else can you make this many adorable and yummy cookies?


Lemon Spritz Cookies
Makes...too many to count (70-80 is a good estimate)

3 sticks of butter, softened
1 cup sugar
1 egg
1 1/2 Tb fresh squeezed lemon juice
1 Tb grated lemon peel
1 Tb half-and-half or milk
3 1/2 cups flour
1 tsp baking powder


1.) Preheat oven to 375'.
2.) Cream butter and sugar.
3.) Add egg, lemon juice and peel and milk.
4.) Add flour and baking powder, mixing to make a smooth dough.
5.) Drop dough in press by the spoonful, tapping against the counter to help get rid of air pockets. Press out cookies and decorate.
6.) Chill in freezer five minutes before baking.
7.) Bake 8-10 minutes. Don't let them brown.
8.) Cool and move to wire rack to set.

Saturday, February 19, 2011

Easy Bread Pan Lasagna

Easy Bread Pan Lasagna is my solution to my love-hate relationship with this dish.  

To Love: The way lasagna smells when baking in the oven. The crispy outside pieces. The frilly edges of the noodles. The special-occasion-ness of it.

To Hate: Pre-boiling and then working with those darn noodles. I always boil too many or, worse, not enough. Just as bad are those anemic, expensive, no-boil noodles without the frilly edges. And having to bake an entire 9"x13" pan is overkill for our small family.

Then I tried this method of adding water to the sauce and heating it first. Voila! Wait, what's the Italian equivalent for that? Oh well. No more messy pre-boiling the noodles. And instead of one giant 9"x13" pan of lasagna (which you can still do if that works better for your family) I split the ingredients between three bread pans--more crispy, yummy edges, more flexibility. I can bake one pan for my family and have two in the freezer for later in the month. Or, if we have guests, I can bake all three. So if you're feeling inspired to make marinara from my last post, here's an idea for how to use your sauce this week.
Easy Bread Pan Lasagnas
Makes 3 

2 lbs ricotta
1/4 cup parmesan
1 tsp salt
1/2 tsp pepper
2 tsps basil
1 egg
1 jar spaghetti sauce
1 cup water
2 cups shredded mozzarella
1 lb of lasagna noodles, uncooked

Preheat the oven to 350'.
1.) Mix ricotta through egg in a bowl
2.) Pour sauce in a pan; add one cup water; heat on low.
3.) Grease three lasagna pans, bottom and sides.
4.) Pour 1/2 cup hot sauce in bottom of each pan.
 5.) Add one layer of uncooked lasagna noodles, breaking the noodles to fit the pan and overlapping them.
6.) Dollop four spoonfuls of ricotta mix over top of dry noodles. Spread evenly.
7.) Repeat Steps 4, 5 and 6 twice more, ending with dry noodles.
8.) On top of the third layer of noodles, split the remaining ricotta cheese mix across the three pans and spread evenly.
 9.) Tap the pans on the counter to eliminate air bubbles and to make sure the dried noodles are fully saturated in the sauce. Shake the pan left to right, top to bottom.
10.) Split the 2 cup bag of shredded mozzarella between the three pans. Sprinkle with parmesan, basil, salt and pepper.
11.) Bake (over a cookie sheet to catch any troublesome spillage) for 35-40 mins or until the top is bubbly and a knife pierces through without resistance from the noodles.*

*If you're freezing these or will reheat them as a whole pan at a later date, undercook the noodles just slightly. Take maybe 5-10 minutes off the bake time. This means that when you pierce the lasagna with the knife you'll feel the knife pass through the noodles. Before freezing, let the lasagnas cool completely, then wrap with Saran Wrap then foil. For added protection, slip each pan into a gallon-sized freezer bag. They should keep around a month. When you reheat them, thaw in the fridge overnight. Cover with greased foil (so you don't lose your cheese topping) when you bake them in the oven at 350' for about 30 mins.

Tuesday, February 15, 2011

Marinara--less meat, more veg

Everyone loves Italian food, and nothing smells quite so good as marinara simmering on the stove top. Garlic, onions, basil, olive oil and, in this case, sausage. Mmm. Toss it on some spaghetti, serve with toasty garlic bread and a salad and you have home comfort food or dinner for company. Bag your extra marinara for the freezer or put some aside in the fridge. This recipe will make about 12 cups of sauce.

My original marinara recipe comes from my mother-in-law. She uses a tri-fecta of meat to flavor her sauce--stew beef, breakfast and Italian sausages, and homemade meatballs---and cooks it for five to six hours. It's absolutely delicious. With trying to cut back on meat at our house I went for maximum flavor for minimum meat and fat with turkey sausage and extra veggies instead with the carrot puree.

I also tried a little experiment on the cook time. We're running low on gas and I didn't want to simmer my sauce for five to six hours. Instead I set aside a quart of sauce that had cooked for just about two and half hours in the fridge and poured the rest into the crockpot. I set the crockpot to low and let it sit overnight. The next morning I tasted both versions and found...that I liked the version that cooked for less time better. Maybe I cooked it for too long or maybe the crockpot just didn't do the trick. One thing Mom does put in this sauce that I had never tried and found incredible was dried dill. Dill gives the sauce a nice fresh flavor.

Long story short, if you don't have time to cook your sauce all day and if you want to cut back on meat and add some extra veg to the mix, give this recipe a try. Thanks Mom for your help in learning how to make marinara from scratch. You saved me from Ragu!

Marinara
Makes about 12 cups

1 large yellow onion, diced
2 cups cooked carrots
1 head of garlic, minced
olive oil, salt, pepper to taste
3 turkey Italian sausage links
6 turkey breakfast sausage links
3 cans of tomato paste (and 3 cans of water)
4-29 oz. cans of tomato sauce (each with 1/4 can of water)
1 tsp dill
1 tsp red chili flakes
1 1/2 Tb basil
pinch of sugar
1/2 cup grated parmesan
 1.) Break up the sausage, squeezing the meat from the links. Saute in Dutch oven or large pot until browned. Drain any fat and set meat aside.
2.) Saute onion in olive oil until soft and translucent. Transfer to food processor or blender.
3.) Add cooked carrot to the onion in the food processor and blend until smooth. Might still be a little chunky. Don't worry, it will cook down in the sauce.
4.) Add tomato paste to the Dutch oven and cook for a few minutes. Fill each paste can with water and add to the pot.
5.) Transfer pureed carrot and onion puree and cooked sausage and cook for one hour.

6.) Add tomato sauce and about 1/4 can of water for each. Add all spices and a pinch of sugar. The idea with the sugar is just to add enough to balance out the strong acidity in the tomatoes. I prefer my marinara more spicy than sweet. Adjust spices to taste.
7.) Add parmesan. I use the regular Kraft grated parmesan. Real parmesan grated into this sauce turns into a gloopy mess.
8.) Cook sauce at least another hour. Serve immediately, refrigerate for a week or freeze for a month.

Tuesday, February 8, 2011

Crazy Monkey Protein Smoothie

My boys get excited when they see the chocolate syrup bottle come out of the fridge at breakfast time, and I love that they're getting lots of protein. Try this shake with a yogurt and soy milk/milk combination if you don't have kefir on hand. Don't tell the kids but I also sneak cooked sweet potato or carrots in this when they're not looking. They've never noticed! For easy cleanup, use an immersion blender like the one pictured below. They have fewer pieces to clean up than a blender.

Crazy Monkey Breakfast Smoothie
2 bananas, peeled
2 Tb chocolate syrup (I've also used 1/2 packet of hot cocoa powder)
2 heaping Tb smooth peanut butter
kefir (or 1 cup of plain yogurt and milk or soy milk)

1.) Place bananas, chocolate syrup and peanut butter in blender cup.
2.) Pour kefir until cup is 3/4 full. Blend until smooth. Serve.


For more recipes visit www.feedingfourfood.blogspot.com.
Related Posts Plugin for WordPress, Blogger...